Anatomy of a Kite
Frame - Usually made of dowel rods or plastic. Dowel rods are round wooden sticks used to make the frame that gives the kites it's shape. They are the backbone of the kite. Sand the ends round so they don't punch holes in the sail material. For most kites, 3/16" is probably sufficient. For larger kites, you may have to go up to 3/8" dowel rods. If you get more serious, then fiberglass is a good choice since it is almost indestructible.
Sail - Material covering the frame that catches the wind. It can be made from tissue paper, Mylar, plastic bags, table coverings, ... Tissue paper is easy to find in craft stores is light weight, but tears easily and thus is a poor choice. Mylar plastic can usually be found in craft stores next to the tissue paper. It is stronger and water proof. Plastic from bags or table coverings can also be used. Some of this is fairly heavy and doesn't work well on small kites. Color is important because you want the kite to show up in the sky. Bright colors are best. Avoid white and blue and they tend to blend in with the background.
Bridle - This is the string that is permanently tied to the kite. You attach the long line to the bridle.
Flying line - Cotton is a poor choice. Polyester is better, but braided Dacron is probably the most widely used string. The cheap cotton string you find in craft stores is okay for small kites.
Tails - Tails are used to make a kite more stable in high winds. Too much tail can make a kite slow, or difficult to get off the ground. Tails can be made from almost anything. A streamer of plastic or crape paper, a string with paper/plastic tied onto it like bows, a windsock, anything that adds weight or wind resistance. On one really windy day, I flew a fighter with a shoe as the tail.
Swivel - The swivel attaches to the end of your flying line. Using a swivel prevents the string from getting too many twists in it. Use one appropriate for the pull of the kite. These are readily available at fishing supply stores.
Ring - Use a ring attached to the bridle to adjust the attach point for the flying line. This is important for flying in different speed winds. Put the ring lower (nearer the middle of the bridle) in light winds. This will make the kite fly more vertical, thus giving it more area to catch the light breeze. Put the ring high (between the middle and top attachment point of the bridle) in high winds. This will make the kite fly more horizontal giving it less surface area so that it slides through the wind. Attach the ring as illustrated below. Two kinds of rings are generally available - split and solid. Split rings are like those used on key chains, only smaller. Solid rings are just plain circles. Split rings are available at craft stores, solid rings are available at craft stores.
Adhesive - For tissue paper, regular white glue works fine. For Mylar or plastic, use duct tape. It may not be too pretty, but it is strong and will stick to almost anything.
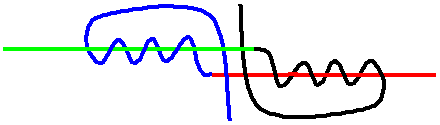
Knots - See Al Folsom's Animated Knot Page for help in tying knots. Knots that you may find helpful are the blood knot for tying two lines together, the bowline for tying a loop at the end of a line, the overhand for tying a loop in the middle of the bridle, improved clinch knot for tying line to a swivel, and the square knot.
Blood Knot (3 turns are best)

Improved Clinch Knot (5 turns are best)
Winder - Keeps string from twisting. You know those spools of kite string that you see everywhere. Well, every time you loop the string around the cardboard tube, you put another twist in the string. Eventually your string will get very tangled and knotted unless you use a winder. With a winder, the string doesn't get twisted because you are wrapping string on the winder instead of looping it around. Winders are also faster because you get more inches per wrap.
Messenger - This is a square or circle piece of paper about 5" wide with a slit cut to the center. Put the slit on flying line. Scotch tape the ends together to form a cone. The cone should point towards the flyer, that is, the open end is towards the kite. Once they go up, they stay up.
Common Sense Rules
* DON'T fly in rainy weather - kites fly high and can attract lightning.
* DON'T fly near power lines, trees, buildings - they all eat kites!
* DON'T use any metal in construction or string - you don't want to be a lightning rod!
* DON'T fly near other kites - your stings may get entangled.
* DON'T fly over anyone, they could be injured by a swooping kite.
* DON'T let go of your kite string - you will look funny running across the field chasing it.
* DON'T expect the spool of string you just bought to be tied to the tube it came on (see above about kite chasing).
Balance - Balance is VERY important. A kite that isn't balanced will tend to fly to one side, or into the ground or do loops. Use this method to balance the kite during construction to find the center of the crossbar. Rest one end of frame on a table. Rest the other end on your finger. If the frame rotates to one side, adjust the crossbar to the other side until the frame stays centered. After the kite is completed do this again to double check. If you want you can add weight in the form of clay or wire to the high end of the crossbar to balance it out. When the bridle is attached, hold the kite at the towing point. If the kite rotates to one side, add some weight to the high side of the crossbar to balance it out.
Tips
To bring down a kite quickly, have a friend put the flying line under his/her arm (in their arm pit) and walk towards the kite.
Launching - To launch a kite let out some (50 - 100 feet) flying line, have a friend hold the kite in its flying position. The wind should be at the flyers back. Release the kite on your signal. Letting out line too quickly will cause the kite to loose altitude. It is best to let out some line, let the kite gain altitude, then let out some more line, ...
Trouble Shooting
Kite will not rise - Too little wind, try adjusting the towing point lower.
Kite tips over/crashes - Wind too strong, try adjusting the towing point higher. Add a tail. Also, this could be a balance problem. Check indoors away from drafts. Hold by towing line. See section above on balance.
Kite shakes back and forth - Wind too strong, try adjusting towing point higher. Make the bridle longer.
Kite tips forward - Towing point is too high, lower it.
Kite tips back - Towing point is too low, raise it.
| Sled Kite |
|---|
| Materials | Tools |
|---|---|
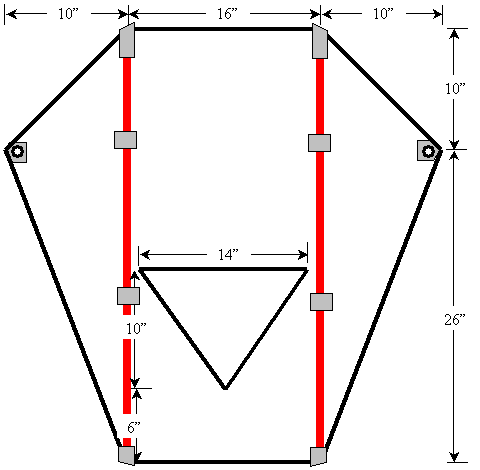
| 36" x 36" plastic 2 3/16" dowel rods 36" long 10' 20 lb. test string Ring | Yardstick Permanent Marker Duct Tape Scissors Hole Punch |
The sled kite is perhaps the easiest to build and fly. It will fly in a very gentle breeze. Avoid strong winds as they may break the kite or the string. It can be scaled up or down as desired, but if scaling up it will pull hard and you will need very strong string!
The plastic can be either a plastic bag or plastic table covering.
- Use a yardstick to draw the sail on the plastic, as illustrated above.
- Cut the sail out.
- Cut out the triangular shape in the middle bottom of the sail.
- Lay the dowel rods on the sail as in the illustration (red). Use duct tape to secure their ends. You might also want to place a couple pieces of duct tape along their middles.
- Put duct tape on the two corners and punch a hole in them for the bridle.
- Tie bridle string to both holes using square knots.
- Find the middle of the bridle. Using the illustration below, tie a ring onto the bridle at the mid-point.
-
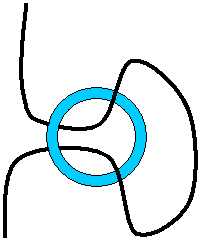
Knot

| Kite Winder |
|---|
| Materials | Tools |
|---|---|
| 2 pieces of wood 2" x 1" x 8" long 2 1/2" dowel rods 8" long< String | Drill Clamp Hammer |
- Cut wood to size.
- Clamp the two pieces of 1x2 together.
- Drill a hole in the wood about 2 inches from each end. Use a drill bit that is slightly less than 1/2".
- Unclamp the wood and tap the dowel rods into the holes as shown.
- Tie the string onto one of the dowel rods using a square knot. You might want to tie a couple square knots to make sure it doesn't come loose and you end up chasing the kite across the field.
- Wind the flying line from the spool onto the winder. Use teamwork. Have one person winding and the other holding the string with the tube on his fingers. Don't wind too fast as many bad things can happen.
- Tie a swivel to the end of the flying line using a couple of square knots.
- References:
- Into The Wind for kites and parts
- Seven Kites by David Gomberg
- Kites and Other Wind Machines by Andre Thiebault
- Kiteworks by Maxwell Eden
- The Big Book of Kites by Jim Rowland