Cubmaster: Cub Scouts, Parents, and Leaders, we are here tonight to honor No. of our Webelos Scouts, who are to come before this Pack to be presented with the highest award in the Cub Scout program, the Arrow of Light.
Akela: Akela was the Big Chief of the Webelos tribe; tall, stalwart, straight as an arrow, swift as an antelope, brave as a lion. He was fierce to an enemy but kind to a brother. Many trophies hung in his teepee. His father was the son of the great yellow sun in the sky. His totem was the Arrow of Light.
Cubmaster: Will the following Webelos Scouts please come forward.
(Cubmaster is standing behind the Arrow of Lightboard and boys will be facing him)notes
Cubmaster: The emblem you see before you represents the Arrow of Light. The seven candles represent the rays in the Arrow of Light. These candles also represent the Seven Virtues of Life.
(Cubmaster then lights each of the candles one at a time and says):
1. This candle represents Wisdom
2. This candle represents Courage
3. This candle represents Self-Control
4. This candle represents Justice
5. This candle represents Faith
6. This candle represents Hope
7. This candle represents Love.
Akela: And the largest candle of them all represents the "Spirit of Akela"
(He then lights the candle)
Cubmaster: If you live by the seven great virtues and the "Spirit of Akela" you will become a happy man and a happy man is a successful man.
(At this time the boys turn and face the audience so parents will be facing the audience too)
Will the parents of these Webelos Scouts please come and stand behind your son.
Present the leader with the Arrow of Light to give to the Webelos.
Source: Greater Alabama Council
Personalize your drink coasters with this excellent themed craft. Your kids can customize them for special occasions like New Year, Christmas, Thanksgiving, Hanukkah, and more.
What you'll need:
How to make it:
- Open the graphics software and choose Avery Kids #03111 Square Stickers as the format.
- Design the coaster to match the celebration that you are having.
- Add photos to the coasters if you would like a personalized coaster for each guest.
- Print out the stickers, and let dry.
- Peel off stickers, and apply them to cardboard.
- Cut around stickers.
- Apply Con-Tact paper on the top and the bottom of the coasters. Be sure to leave enough Con-Tact paper around the coaster to seal it from spills.
- Set out and enjoy the compliments.
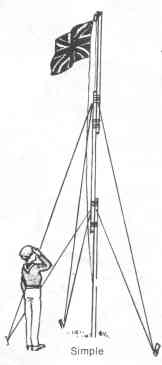
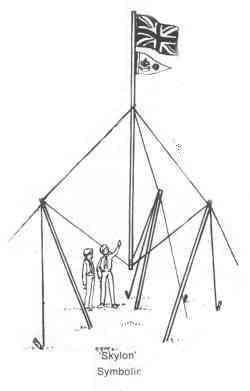
General Gadgets - Flag PolesFlag Break should be a daily routine of (any?) camp and as such you may find yourself having to construct your own flag pole. There are many different types you can attempt from the simple everyday 'upright' to the more difficult but much better looking 'Skylon' type.
| ||||||||
General Gadgets - Shoe Rack
| ||||||||
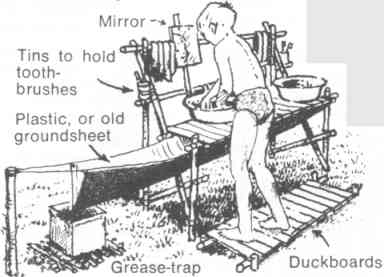
General Gadgets - Washing Area
| ||||||||
General Gadgets - Shower
| ||||||||


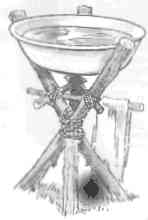
Kitchen Gadgets - Bowl Stand
| ||||
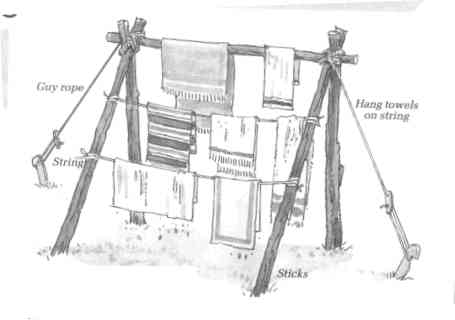
Kitchen Gadgets - 'Clothes Line'
A line for drying those tea towels and sundry clothing items will be essential for any camp kitchen. This is very simple to construct, as you can see from the picture. Simply drive two uprights into the ground and lash a cross piece to join them across the top. To ensure the structure is sturdy you could add two further poles lashed at an angle to form a simple 'A' frame at either end. Attach guy ropes to the two ends and peg out to keep the clothes rack on the ground in those high winds. You can add several lines by lashing ropes across the uprights (or even saplings), on which you can hang your towels to dry. | ||||
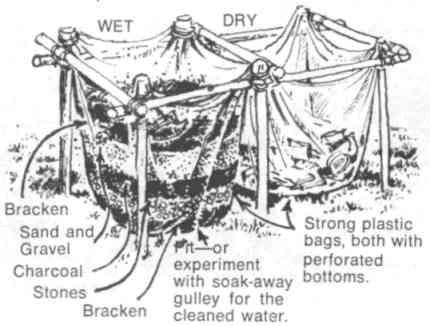
Kitchen Gadgets - 'Filter Bins'
| ||||
Pioneering - Nets
A net type construction can be very useful in many different situations. Perhaps the most obvious use is as a 'fishing net' but it can also be used for hammocks, simple 'carry-all' and for storage space (Suspend your food above the ground within the net at camp).
There are two main ways of making a net. One is to tie the knots by hand and the other is to 'knit' it. The latter needs practice whilst the former can be very time-consuming. The best type of 'rope' to use for nets is a type of thick twine or parcel string. Parachute cord is ideal but not exactly available in the shops. Experiment to see which lines work and which dont.
'Knot your net'
It is much easier to use this technique if you have two 'uprights' to suspend a rope between. Decide how wide you want your net to be and set the two uprights that distance apart. Tie a length of twine between the two (this should be thicker than the twine you will use for the strands). You will now need to cut many lengths of rope. The length will determine the depth of the net (as a guide this will be around 3/8 of the total length of your twine). It may also be an idea to have something to use as a 'ruler' to keep the net spacings equal. Depending upon the intended use of the net, the spacing will be somewhere between 2-5 cm.
Take the lengths of twine you have cut and 'double' them (fold them in half). Now take the bight (loop) and make a prusik knot over the length of twine you strung between the uprights. Do this all the way along the length of the twine making sure to space them evenly with your ruler.
You will now have many lengths of twine hanging down. Starting at the left hand side we will ignore the very first strand (of the pair as each set hanging down has two strands), this will form the end of the net. Take the second of the pair and hold it together with the first strand of the next pair (it all becomes obvious if you look at the diagram!). Tie these together with an overhand knot. Repeat this process with the next two strands along until you reach the end of the net. Remember to space them evenly with your ruler
.
Now move down a 'row' and repeat. The only difference here is that you will use the very end strands (to form a diamond like pattern). For the next row down you ignore the first and last strand. The next you include them and so on.
When you reach the bottom of the net, you will need to put another length of twine across between the uprights (like the one the strands are hanging from). It would be sensible if this was a thicker strand as it has to bear most of the strain. Now tie the strands hanging down, in pairs, to the bottom line of the net so that they are secure.
You now have a net ready for use. It may help to secure the four corners of the net (where the strands tie to the two lengths) to make sure the net will not slip up and down the lengths. I also find it useful if the lengths have a fair amount 'left over' so that you can tie the net to other things (e.g. use as a hammock).
'Knit your net'
Hammocks
To make a hammock simply construct a net (using your preferred method) which is at least 75 cm across and most certainly wider than your height! As it will have to take your weight make sure you use strong twine or even rope for the top and bottom lengths (ones between uprights). If you cannot do this use a doubled length of your twine instead. You need to leave a long end so that you can secure the hammock between two suitable points.
To prevent the hammock 'twisting over' you will find it useful to use a spacer bar at each end. Simple put a notch in the end of a suitable 'bar' and slip the twine ends into the notches.
You may want to tie the two ends lengths together to form a closed loop (e.g. a bowline) to make it easy to slip the hammock over a protusion.
Note that it takes practice to slip in a hammock, it is not as easy as it looks!
Need to apply torque to a pipe? As demonstrated in the Power of Friction page, rope can really grab, given a few turns.
This same principle can be used to torque a smooth cylindrical object. Use a long bar as shown above and plenty of turns of rope to get a grip. You can use fewer turns of rope if you put a tight binding hitch on the ends or if you weight the ends of the rope.
If you don't want to marr the object you're turning, wrap the lever with leather or some other cushioning material.
 | Versatackle The Versatackle is a method of gaining mechanical advantage with rope much like a block and tackle.
|
| Typically, you pull the free end through each loop 2 or 3 times, depending on the rope and the situation. Surprisingly, it is self-locking. That is, you can give a pull and when you release, the Versatackle's internal friction will hold the load. Use for binding, clamping, pulling or whatever. The downside is that it can be hard on rope. If you're tying down a load on a truck, tie the butterfly a few feet off the bed, loop the rope down around a hook, and tie another butterfly with plenty of extra rope, just like loop B. You can figure out the rest from there. This concept is easily adapted to various uses. You can also gain mechanical advantage with a rope in a little more involved method called the Spanish Windlass. | |