Objective: Instruct students on proper use and safety of heat sources
Introduction |
||
|---|---|---|
| What is the Firem’n Chit Requirements of What does the Firem’n Chit Cover Outdoor Code |
||
The Main Course |
||
| Three things a fire must have Science of Fire Types of wood Fire Layouts Fire usage and weather considerations Starting a fire Fire Safety Low Impact |
||
Ending |
||
| Tests How to get help and additional resources |
||
Everyday Americans experience the horror of fire. But most people don't understand fire. Only when we know the true nature of fire can we be prepared ourselves. Each year more then 5,000 Americans die and more then 25,000 are injured in fires many of which could be prevented. It is interesting to note that children of all ages start 100,000 fires annually. Approximately 25,000 of those fires are set in houses. That children make up between 20% - 25% of all fire deaths and that over 30% of the fires that kill children are set by children playing with fire.
What is the Firem’n Chit:
The Firem’n chit is a card issued to a Scout authorizing him to use fires and other hot objects.
BSA Requirements for the Firem'n Chit are:
- I have read and understand fire use and safety from the Boy Scout Handbook
- I will secure necessary permit (regulations vary by locality)
- All flammable vegetation to be cleared at least ten feet in all directions from fire
- Fire must be attended to at all times
- Fire-Fighting tools (water and/or shovel) must be readily available
- Fire must be cold out before leaving
- I subscribe to the Outdoor Code
What Does the Firem'n Chit Cover:
- Fires
- Stoves
- Lanterns
- Fire Starters
- Any Hot objects
The Outdoor Code:
The Outdoor Code is a creed an oath to remind a Scout of the importance of caring for the environment.
BE CLEAN IN MY OUTDOOR MANNERS,
I will treat the outdoors as a heritage. I will take care of it for myself and others. I will keep my trash and garbage out of lakes, streams, fields, woods, and roadways.
BE CAREFUL WITH FIRE,
I will prevent wildfire. I will build my fires only where they are appropriate. When I have finished using a fire, I will make sure it is cold out. I will leave a clean fire ring, or remove all evidence of my fire.
BE CONSIDERATE IN THE OUTDOORS,
I will treat public and private property with respect. I will use low-impact methods of hiking and camping.
BE CONSERVATION-MINDED.
I will learn to practice good conservation of soil, waters, forest, minerals, grasslands, wildfires, and energy. I will urge others to do the same.
Science of Fire::
| What is fire? Fire is a chemical reaction, between different chemical compounds or elements, each has stored energy. With the right mixture a fire will happen. For example, for a fire to occur these items have to come together: heat (ignition source); fuel (something to burn); and oxygen (air). Remove any of them and the fire will not happen. |  |
The main types of wood:
- Wood Hardness:
- Hard: good for slow burning fires that yield long lasting colas. Hardwood trees usually have broad leaves which most of them lose there leaves in the fall (deciduous)
- Soft: make a hot and fast fire that is short-lived. These trees have needles (cedars, pine) and cones. Most are evergreen (ones that don't lose there needles) except larch, cypress, and tamarack.
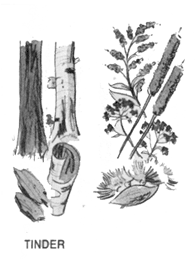 Tinder: Tinder absorbs moister easily and may be least effective when you need it most. The mountain men knew to keep their tinder dry.
- Dry grass, dry leaves, and very fine fibers of dry bark, such as birch or cedar, are types of tinder you may be able to find outdoors. Usually, the finer the tinder the better. Start with a base of fine tinder and form a teepee-shaped pile, about 2" high, with larger tinder over the finer.
- Char cloths are how our forefathers started fires. They used dutch ovens to char cotton cloth, and often used a gun flint to set sparks to the cloth. To make char cloth, cut up old denim jeans, or some other dense cotton fabric, into small 1" to 2" squares, and char these by burning them in a closed container such as a can, dutch oven, or ball of clay. If using a can, poke holes in either end using a nail, make sure there is not paint or fumes in it, and that you can get the lid off afterwards. Place the squares loosely in the can, and cook on a bed of coals (don't do this in your oven where the smoke and smell can get out of hand). Try to keep the smoke that is blowing out of the can from catching fire, and be careful lest the lid blows off the can. The char cloths are done when no more smoke blows out of the nail holes. The cloths should come out soft and black, with no residual fabric. If not completely soft and black, they have not cooked enough. Use char cloth for tinder to catch the spark on from flint and steel. When the spark catches and the cloth glows red, place it quickly in some tinder, dry grass works great, and blow into flame.
- Dryer lint from cotton or wool fabrics is a modern favorite. However, take care not to use lint from synthetic fabrics...it melts instead of burns.Pitch or waxed fire starters are easily made from paper dipped in wax, pitch, or tar.
- Magnesium shaved off a magnesium block/flint and steel kit is highly flammable. Use a pocket knife to shave off the block a nickle-sized pile of magnesium slivers.
- Old web belts or compression straps also make great fire starters. Cut the belts/straps into 3" to 4" long strips, soak them in wax, and let dry.
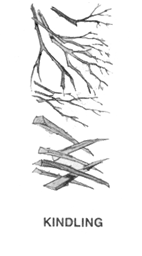 Kindling: Younger scouts often seem to forget the kindling, and then wonder why their fire won't light when they try to set spark to just tinder and a few large pieces of wood! Remember, wood requires more heat than kindling to ignite. Therefore, it is essential that some form of kindling be used to feed a fire until it gets hot enough to ignite the larger pieces of wood.
- Dead twigs that snap in two when bent. Don't use green twigs that are still flexible, and obviously, the drier the twigs the better. Soft woods, particularly evergreen twigs, are best, and split twigs burn faster than whole ones.
- Fuzz sticks are dry sticks shaved on the sides with a knife so that the shavings are still attached to the stick.
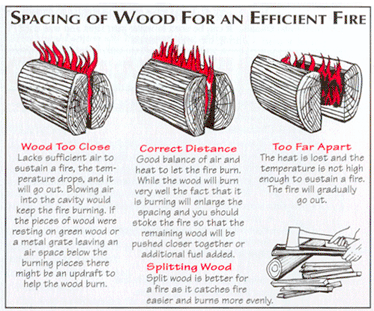
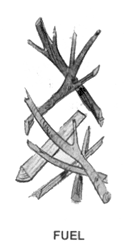 Fuel: A good supply of fuel needs to be gathered BEFORE building the fire. Use what fuel is available, keeping in mind that the drier the fuel, the better.
- Dead, dry wood is best. Generally, the denser the wood (in other words, the heavier it is), the hotter the fire, and the slower it burns. Wet wood, green wood, and wood with lots of pitch will burn, but tend to smoke. However, almost any wood will burn if the fire is hot enough. Also, splitting the wood helps. The finer it is split, the better it burns, and the less smoky the fire.
- Cow chips, as long as they are dry, will burn. Although they smell, burning cow chips helps keep the mosquitos away. The greener the are they more they smell, and the less likely they are to burn!
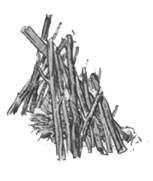
Four main types of fire layouts:
- Tepee
- the traditional standing triangular fire base, with tinder underneath the standing twigs and logs. Allow enough room for air circulation in and between the logs. This type of fire is used in calm weather when you want a tall flame.
 A basic fire that is quickly built and can be used for small campfires, or to start other fires. Push two crossed sticks into the ground next to tinder. Lay kindling on the crossed sticks and over the tinder in the form of a teepee, and add larger pieces of wood to the outside. The high flames of a tepee fire are good for one-pot cooking and reflector ovens.
- Log Cabin
- rectangular layout of logs built on top of each other like a log cabin with ignition source in the middle and bottom. Will collapse on itself as fire consumes material. Method allows for adequate air circulation and ease of adding additional layers. This type of fire is better for harsh conditions, or when big fires are wanted.
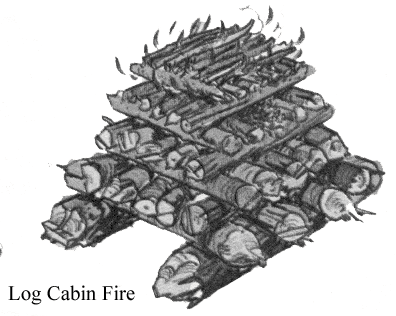 This is a large fire that is built by criss-crossing logs and sticks in the shape of a pyramid with a hollow center. Place the largest logs at the base and build up to a top of kindling. Tinder can be placed at the top, and the fire will burn from the top down, or a tepee of tinder and kindling can be placed in the center of the log cabin if it is well ventilated with an open framework. Log Cabin fires are good for group campfires with lots of people. Although they make lots of coals, which can be good for cooking, log cabin fires tend to be large, making it hard to get close to them.
- Lean To
 Alternate, stick the end of the stick in the ground at an angle and lean other smaller sticks against it. Put tinder inside and light from the open end. This type of fire is used when the wind is coming from only one direction, it is also great for cooking as the flames are all on one side.
- This type of fire is mainly a cooking fire that creates a nice bed of coals for Dutch Ovens or for roasting. Build the fire against a large log by placing tinder and kindling next to the main log and leaning wood against the log and over the tinder. As fuel is added, it is leaned against the main log, which acts as a reflector and allows coals to bank up against the reflector.
- Charcoal
>
Please note that the Scouts nor the adults are allowed to use any kind of gas on a campfire for any reason. Not only is it dangerous, but is just not a good example to set.
- Usage
- Cooking: Fires are great to cook on or over
- Entertainment: Many groups like to have a campfire program around a fire or at least tell ghost stories and whittle on a piece of wood.
- Weather: Always keep an eye on wether, things like rain, snow and especially wind make a big difference on how you build a fire, and how big a fire may be allowed to become.
Starting A Fire:
Scouts love fires, and even though the ability to build a fire is one of the most important survival skills that a scout can master, many scouts have trouble getting a fire started.
Some things to remember:
- Choose the Location for your fire carefully.
- Spark, Tinder, Kindling, and Fuel are all required to build a fire. Keep them dry.
- Light your Fire by shielding your match from the wind, and light the fire on the downwind side.
- Fires need Oxygen, so don't smother yours with too much wood.
- Extinguish your Fire properly when done.
Spark:
 All fires begin with a spark. There are many ways to make a spark. Here are some of the more common.
- Matches - These should be carried with you at all times in the outdoors (remember they are one of the ten essentials). Make sure your matches are "strike anywhere" type and waterproof them by dipping each match in nail polish or paraffin wax. After dipping, place the matches in corrugated cardboard to dry, and roll the matches up in cardboard. It is good idea to put a piece of sandpaper in your waterproof match container to use as a striker.
-
Flint and steel - One of the safest and most reliable ways of starting a fire is with flint and steel. Magnesium blocks with attached flints are readily available these days in most Sporting Goods stores, and magnesium scraped off the block with a pocket knife makes great tinder. Use a key chain to attach a broken hacksaw blade to the magnesium block, and you have a ready made steel striker that will prevent wear and tear of your pocket knife. Strike a file, hacksaw blade, or knife against the flint to shower sparks against your tinder (a char cloth works great here), and watch for a wisp of smoke or a glowing red spot when a spark catches on the tinder. Once a spark cathces, blow on the tinder until it bursts into flame.
- Cigarette lighters - Actually just a modern form of flint and steel. It is a good idea to always have at least a couple of cigarette lighters among your ten essentials.
- Battery - A little known trick is to conduct electricity from flashlight batteries through steel wool. Use a very-fine grade roll of steel wool, cut or tear the roll into strips 1/2" wide, and unroll the strips to 7" or 8" long. Although one battery will work, two are better. Place the batteries on top of each other in upright positions. Take one end of a strip of steel wool and hold it against the bottom of the lower battery, then rub the other end of the wool across the top of the top battery. When the steel wool sparks, place it next to the tinder, and blow on it to start a fire. An electric spark from a car, snowmobile, boat or airplane battery can also be used to ignite a rag dampened with gasoline. However, DON'T DO THIS NEAR YOUR FUEL SUPPLY!
- Magnifying glass - A magnifying glass in direct sunlight with the point of light focused on dry tinder will cause the tinder to smoke and eventually break into flame. In an emergency any convex lens will do, including camera or binocular lens.
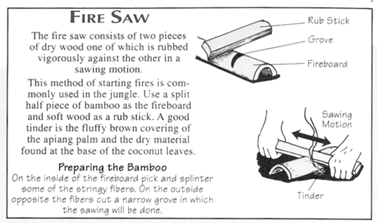
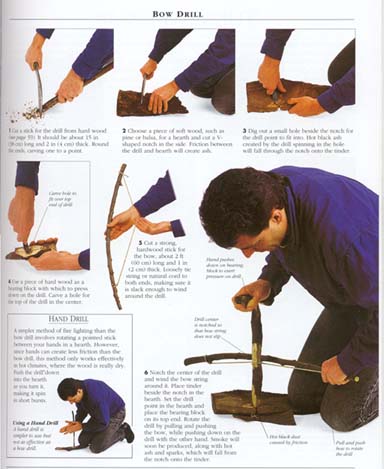 Rubbing two sticks - This was how the California Indians did it. Most used a softwood drill, a bow, and lubricated hand socket, together with a hardwood fireboard to create heat that eventually lit tinder. It is important that one of the woods (either drill or fireboard) be soft and the other hard. Woods commonly used were Yucca for the softwood and Oak for the hardwood. A notch is cut in the side of the fireboard through which a drill will pass and rest on a flat, shallow grooved surface below. A socket (lubricated with grease) is held in the hand and allows the drill, which is rotated back and forth with the bow string, to turn freely without hurting the hand. As the drill rotates, a fine dust results that becomes hot from the friction of the drill. When the dust starts to smoke, it is placed on the tinder, and blown on until it bursts into flame. Starting fire by rubbing two sticks together is a difficult skill to master, but some experts can start a fire in literally just a few seconds using this technique.
Lighting a Fire:
- Select a sheltered area that is out of the wind and located where the fire won't spread.
- Use dry tinder, or tinder which is highly flammable even when wet, such as birch bark or pitch.
- Have all the kindling and wood on hand before you strike the match.
- Use the match to light a fire starter, such as waxed paper or a sliver of pitch, then use the the fire starter to acually light the fire.
- Start with a small fire and add to it as the flame increases. Blowing lightly on the burning wood helps to increase the flame. Also, add kindling above the flame, and use dry dead, wood.
- Keep your firewood dry by palcing it under a shelter, dry out damp wood near the fire, and save the best kindling for starting the next fire.
- Build as many fires as possible without using matches, and save your matches for emergency uses.
- It is easier to keep a fire going than to light one. To make a fire last overnight, place a layer of dry, green logs over the coals at bedtime, to keep the coals smoldering till morning.
Rules:
 Dig a pit from overhanging branches
- Circle the pit with rocks
- Circle a 10 foot area around the pit down to the soil
- Stack extra wood upwind and away from the fire
- After lighting, do not discard match until cold
- Never leave a campfire unattended
- Keep a bucket of water and shovel nearby
Needed Gear:
- Water
- Shovel
- Adult Supervision
Putting Out A Fire:
Knowing how to extinguish a fire properly is just as important as knowing how to start one.
- Break up the fire with a shovel spread out the coals evenly.
- If water is available, sprinkle it over the coals while stirring them with a shovel. Continue sprinkling water until the coals are cool enough to touch. Do not to pour large quantities of water on hot coals, lest a sudden rush of steam burn you or any bystanders.
- If water is not available, stir dirt thoroughly through the hot coals, and cover with dirt at least two inches deep. Buried embers can continue to smolder for quite awhile, so check them frequently, and don't leave until all the coals are cool enough to touch.
Location:
- Fire is your friend but it also commands respect. Even a small fire, if located in the wrong place, can spread to become a forest fire burning out of control.
- The best place to build a fire is on solid rock, mineral soil, or sand. Fires built on dry grass, leaves, evergreen needles, or dead roots are forest fire hazards..
- If the ground is dry, scrape down to bare earth. In winter dig down to dirt, or stomp down the snow if it is deep. If the snow is very deep, a small fire can be lit on top of a layer of green logs.
- Never build a fire against an old stump.
- Build the fire next to water, or have a supply of sand nearby, in case the fire needs to be extinguished quickly.
- Never build a fire under a tree, especially in winter. Hot air and smoke rising from a fire can cause melting snow to slump off the tree and fall in the fire. It can also ignite dry humus and leaves to set the tree on fire.
Low Impact:
- Build fire only where allowed
- Use existing fire rings and pits
- Collect wood only if it is plentiful and then sparingly, otherwise being your own
- Make sure your fire is dead out
- Scatter ashes, cover black spot with dirt and ground cover to erase burn scars
Tests:
Trick Questions:
| 1) Would you ever put a burning stick up your nose? 2) Would you ever walk over a fire? 3) Would you ever play around a fire? 4) Is there ever a time you can burn down a forest? 5) Does green (wet) wood burn good? 6) Do you ever run around a dead fire? (Answer to all these are no. Even 6, which is because there is no running in camp) |
Serious Questions:
| 1) In many public parks & grounds you may need a _____________ to build a fire. 2) In areas where campfires are not allowed you may need to cook on a ________________. 3) Name two of the four fuels commonly used in camping stoves. 4) Never leave a lighted stove _____________________. 5) Always keep a campfire under complete ____________________. 6) If you must prepare a new fire site remove a (how many) _______________ foot square piece sod and place it in a _________________ place with which side up? 7) What are the three categories of materials needed for a proper fire? 8) What is a fuzz stick? When is one used? 9) Name three types of campfire 'fireplaces'. 10) When putting out a fire sprinkle ______________ on the embers, then _____________ the embers with a stick. 11) When water is scarce, what two items can be worked into the coals to extinguish the flames? 12) When using charcoal, you should light the briquettes how many minutes before you need them? 13) What should a fire site be examined for before leaving the site? |
- Demonstrate
- Have the Scouts, I usually let them do this in small groups, light a fire using what they learned in the course. You can make it more interesting by telling them they will only be able to use 2 matches and this pile of wood. Just make sure they have everything they need to start a fire safely.
Additional Help and Resources:
- First and foremost the best place to find information on this subject is the Official Boy Scout Handbook and Official Boy Scout Field Book
- You may also find information online by using a search engine such as http://www.google.com
Conclusion:
A fire is a good tool when use safely and carefully, but can turn deadly if not used properly. Keep an eye on everything, don't let things get carried away. Remember Safety First, Safety Always.
I use the following books as references to base this document off of:
The Official Boy Scout Handbook, Older versions of the Boy Scout Handbook, Camping & Wilderness Survival by Paul Tawrell, The Complete Wilderness Training Book by Hugh McManners, and various web pages.