In a survival situation, you will be extremely fortunate if you happen to have a map and compass. If you do have these two pieces of equipment, you will most likely be able to move toward help. If you are not proficient in using a map and compass, you must take the steps to gain this skill.
There are several methods by which you can determine direction by using the sun and the stars. These methods, however, will give you only a general direction. You can come up with a more nearly true direction if you know the terrain of the territory or country.
You must learn all you can about the terrain of the country or territory to which you or your unit may be sent, especially any prominent features or landmarks. This knowledge of the terrain together with using the methods explained below will let you come up with fairly true directions to help you navigate.
USING THE SUN AND SHADOWS
The earth's relationship to the sun can help you to determine direction on earth. The sun always rises in the east and sets in the west, but not exactly due east or due west. There is also some seasonal variation. In the northern hemisphere, the sun will be due south when at its highest point in the sky, or when an object casts no appreciable shadow. In the southern hemisphere, this same noonday sun will mark due north. In the northern hemisphere, shadows will move clockwise. Shadows will move counterclockwise in the southern hemisphere. With practice, you can use shadows to determine both direction and time of day. The shadow methods used for direction finding are the shadow-tip and watch methods.
Shadow-Tip Methods
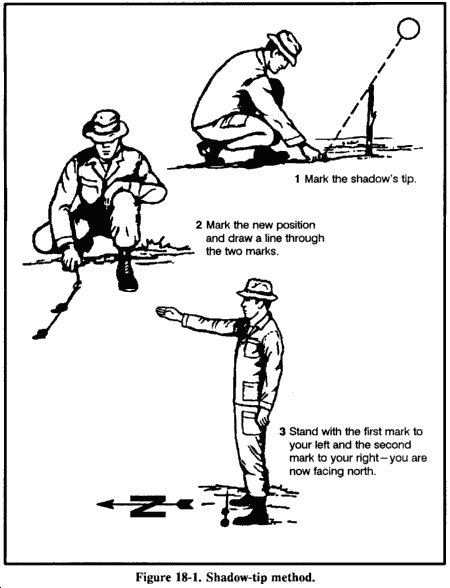
In the first shadow-tip method, find a straight stick 1 meter long, and a level spot free of brush on which the stick will cast a definite shadow. This method is simple and accurate and consists of four steps:
- Step 1. Place the stick or branch into the ground at a level spot where it will cast a distinctive shadow. Mark the shadow's tip with a stone, twig, or other means. This first shadow mark is always west--everywhere on earth.
- Step 2. Wait 10 to 15 minutes until the shadow tip moves a few centimeters. Mark the shadow tip's new position in the same way as the first.
- Step 3. Draw a straight line through the two marks to obtain an approximate east-west line.
- Step 4. Stand with the first mark (west) to your left and the second mark to your right--you are now facing north. This fact is true everywhere on earth.
An alternate method is more accurate but requires more time. Set up your shadow stick and mark the first shadow in the morning. Use a piece of string to draw a clean arc through this mark and around the stick. At midday, the shadow will shrink and disappear. In the afternoon, it will lengthen again and at the point where it touches the arc, make a second mark. Draw a line through the two marks to get an accurate east-west line (see Figure 18-1).
The Watch Method
You can also determine direction using a common or analog watch--one that has hands. The direction will be accurate if you are using true local time, without any changes for daylight savings time. Remember, the further you are from the equator, the more accurate this method will be. If you only have a digital watch, you can overcome this obstacle. Quickly draw a watch on a circle of paper with the correct time on it and use it to determine your direction at that time.
In the northern hemisphere, hold the watch horizontal and point the hour hand at the sun. Bisect the angle between the hour hand and the 12 o'clock mark to get the north-south line (Figure 18-2). If there is any doubt as to which end of the line is north, remember that the sun rises in the east, sets in the west, and is due south at noon. The sun is in the east before noon and in the west after noon.
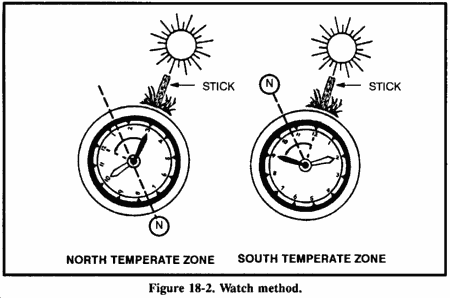
Note: If your watch is set on daylight savings time, use the midway point between the hour hand and 1 o'clock to determine the north-south line.
In the southern hemisphere, point the watch's 12 o'clock mark toward the sun and a midpoint halfway between 12 and the hour hand will give you the north-south line (Figure 18-2).
USING THE MOON
Because the moon has no light of its own, we can only see it when it reflects the sun's light. As it orbits the earth on its 28-day circuit, the shape of the reflected light varies according to its position. We say there is a new moon or no moon when it is on the opposite side of the earth from the sun. Then, as it moves away from the earth's shadow, it begins to reflect light from its right side and waxes to become a full moon before waning, or losing shape, to appear as a sliver on the left side. You can use this information to identify direction.
If the moon rises before the sun has set, the illuminated side will be the west. If the moon rises after midnight, the illuminated side will be the east. This obvious discovery provides us with a rough east-west reference during the night.
USING THE STARS
Your location in the Northern or Southern Hemisphere determines which constellation you use to determine your north or south direction.
The Northern Sky
The main constellations to learn are the Ursa Major, also known as the Big Dipper or the Plow, and Cassiopeia (Figure 18-3). Neither of these constellations ever sets. They are always visible on a clear night. Use them to locate Polaris, also known as the polestar or the North Star. The North Star forms part of the Little Dipper handle and can be confused with the Big Dipper. Prevent confusion by using both the Big Dipper and Cassiopeia together. The Big Dipper and Cassiopeia are always directly opposite each. other and rotate counterclockwise around Polaris, with Polaris in the center. The Big Dipper is a seven star constellation in the shape of a dipper. The two stars forming the outer lip of this dipper are the "pointer stars" because they point to the North Star. Mentally draw a line from the outer bottom star to the outer top star of the Big Dipper's bucket. Extend this line about five times the distance between the pointer stars. You will find the North Star along this line.
Cassiopeia has five stars that form a shape like a "W" on its side. The North Star is straight out from Cassiopeia's center star.
After locating the North Star, locate the North Pole or true north by drawing an imaginary line directly to the earth.
The Southern Sky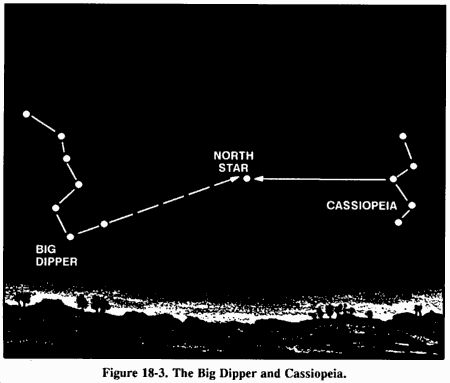
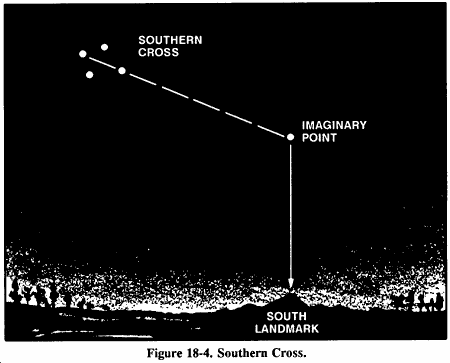
Because there is no star bright enough to be easily recognized near the south celestial pole, a constellation known as the Southern Cross is used as a signpost to the South (Figure 18-4). The Southern Cross or Crux has five stars. Its four brightest stars form a cross that tilts to one side. The two stars that make up the cross's long axis are the pointer stars. To determine south, imagine a distance five times the distance between These stars and the point where this imaginary line ends is in the general direction of south. Look down to the horizon from this imaginary point and select a landmark to steer by. In a static survival situation, you can fix this location in daylight if you drive stakes in the ground at night to point the way.
MAKING IMPROVISED COMPASSES
You can construct improvised compasses using a piece of ferrous metal that can be needle shaped or a flat double-edged razor blade and a piece of nonmetallic string or long hair from which to suspend it. You can magnetize or polarize the metal by slowly stroking it in one direction on a piece of silk or carefully through your hair using deliberate strokes. You can also polarize metal by stroking it repeatedly at one end with a magnet. Always rub in one direction only. If you have a battery and some electric wire, you can polarize the metal electrically. The wire should be insulated. If not insulated, wrap the metal object in a single, thin strip of paper to prevent contact. The battery must be a minimum of 2 volts. Form a coil with the electric wire and touch its ends to the battery's terminals. Repeatedly insert one end of the metal object in and out of the coil. The needle will become an electromagnet. When suspended from a piece of nonmetallic string, or floated on a small piece of wood in water, it wil l align itself with a north-south line.
You can construct a more elaborate improvised compass using a sewing needle or thin metallic object, a nonmetallic container (for example, a plastic dip container), its lid with the center cut out and waterproofed, and the silver tip from a pen. To construct this compass, take an ordinary sewing needle and break in half. One half will form your direction pointer and the other will act as the pivot point. Push the portion used as the pivot point through the bottom center of your container; this portion should be flush on the bottom and not interfere with the lid. Attach the center of the other portion (the pointer) of the needle on the pen's silver tip using glue, tree sap, or melted plastic. Magnetize one end of the pointer and rest it on the pivot point.
OTHER MEANS OF DETERMINING DIRECTION
The old saying about using moss on a tree to indicate north is not accurate because moss grows completely around some trees. Actually, growth is more lush on the side of the tree facing the south in the Northern Hemisphere and vice versa in the Southern Hemisphere. If there are several felled trees around for comparison, look at the stumps. Growth is more vigorous on the side toward the equator and the tree growth rings will be more widely spaced. On the other hand, the tree growth rings will be closer together on the side toward the poles.
Wind direction may be helpful in some instances where there are prevailing directions and you know what they are.
Recognizing the differences between vegetation and moisture patterns on north- and south-facing slopes can aid in determining direction. In the northern hemisphere, north-facing slopes receive less sun than south-facing slopes and are therefore cooler and damper. In the summer, north-facing slopes retain patches of snow. In the winter, the trees and open areas on south-facing slopes are the first to lose their snow, and ground snowpack is shallower.
Source and material above found in the U.S. Army Field Survival Manual 21-76
(Please do not attemp without proper reseach or training)
How to use a compass (Lesson 1)
Using the compass alone
This is a very easy lesson, and I would say, not sufficient for those who would like to travel safely in unfamiliar terrain.
 The first thing you need to learn, are the directions. North, South, East and West. Look at the figure and learn how they are. North is the most important.
There are several kinds of compasses, one kind to attach to the map, one kind to attach to your thumb. The thumb-compass is used mostly by orienteers who just want to run fast, and this is the kind of compass I normally use.
But not in this tutorial. I would recommend the third kind of compass. Let's take a look at it:

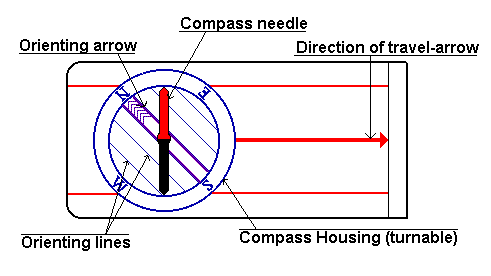
You see this red and silver arrow? We call it the
compass needle
. Well, on some compasses it might be red and white for instance, but the point is,
the red part of it is always pointing towards the earth's magnetic north pole.
Got that? That's basically what you need to know. It's as simple as that.
But if you don't want to go north, but a different direction? Hang on and I'll tell you.
You've got this turnable thing on your compass. We call it the Compass housing. On the edge of the compass housing, you will probably have a scale. From 0 to 360 or from 0 to 400. Those are the degrees or the azimuth (or you may also call it the bearing in some contexts). And you should have the letters N, S, W and E for North, South, West and East. If you want to go in a direction between two of these, you would combine them. If you would like to go in a direction just between North and West, you simply say: "I would like to go Northwest ".
 Let's use that as an example: You want to go northwest. What you do, is that you find out where on the compass housing northwest is. Then you turn the compass housing so that northwest on the housing comes exactly there where the large direction of travel-arrow meets the housing.
Hold the compass in your hand. And you'll have to hold it quite flat, so that the compass needle can turn. Then turn yourself, your hand, the entire compass, just make sure the compass housing doesn't turn, and turn it until the compass needle is aligned with the lines inside the compass housing. Now, time to be careful!. It is extremely important that the red, north part of the compass needle points at north in the compass housing. If south points at north, you would walk off in the exact opposite direction of what you want! And it's a very common mistake among beginners. So always take a second look to make sure you did it right!A second problem might be local magnetic attractions. If you are carrying something of iron or something like that, it might disturb the arrow. Even a staple in your map might be a problem. Make sure there is nothing of the sort around. There is a possibility for magnetic attractions in the soil as well, "magnetic deviation", but they are rarely seen. Might occur if you're in a mining district.
When you are sure you've got it right, walk off in the direction the direction of travel-arrow is pointing. To avoid getting off the course, make sure to look at the compass quite frequently, say every hundred meters at least.
But you shouldn't stare down on the compass. Once you have the direction, aim on some point in the distance, and go there. But this gets more important when you use a map.
There is something you should look for to avoid going in the opposite direction: The Sun. At noon, the sun is roughly in South (or in the north on the southern hemisphere), so if you are heading north and have the sun in your face, it should ring a bell.
When do you need this technique?
If you are out there without a map, and you don't know where you are, but you know that there is a road, trail, stream, river or something long and big you can't miss if you go in the right direction. And you know in what direction you must go to get there, at least approximately what direction.
Then all you need to do, is to turn the compass housing, so that the direction you want to go in, is where the direction of travel-arrow meets the housing. And follow the above steps.
But why isn't this sufficient? It is not very accurate. You are going in the right direction, and you won't go around in circles, but you're very lucky if you hit a small spot this way. And that's why I'm not talking about declination here. And because that is something connected with the use of maps. But if you have a mental image of the map and know what it is, do think about it. But I think you won't be able to be so accurate so the declination won't make a difference.
If you are taking a long hike in unfamiliar terrain, you should always carry a good map that covers the terrain. Especially if you are leaving the trail. It is in this interaction between the map and a compass, that the compass becomes really valuable.
How to use a compass (Lesson 3)
Magnetic Declination
Unfortunately, sometimes, for some quite often, it is even more complicated. There is something called magnetic declination. You see, the compass is pointing towards the magnetic north pole, and the map is pointing towards the geographic north pole, and that is not the same place.  To make things even more complicated, there is on most hiking-maps something (that is very useful) called the UTM-grid. This grid doesn't have a real north pole, but in most cases, the lines are not too far away from the other norths. Since this grid covers the map, it is convenient to use as meridians.
On most orienteering maps (newer than the early '70s), this is corrected, so you won't have to worry about it. But on topographic maps, this is a problem.
First, you'll have to know how large the declination is, in degrees. This depends on where on the earth you are. So you will have to find out before you leave home. Or somewhere on the map, it says something about it. One thing you have to remember in some areas, the declination changes significantly, so you'll need to know what it is this year.
When you are taking out a course, you will do that more or less as described in lesson 2,
but this time, you must also lookout so that you don't align the orienting lines with the grid lines pointing west or east, or south for that matter. When you have taken out a course like you've learned, you must add or subtract an angle, and that angle is the angle you found before you left home, the angle between the grid lines or meridians and the magnetic north.
 The declination is given as e.g. "15 degrees east". When you look at the figure, you can pretend that plus is to the right, or east, and minus is to the left and west. Like a curved row of numbers. So when something is more than zero you'll subtract to get it back to zero. And if it is less, you'll add. So in this case you'll subtract 15 degrees to the azimuth, by turning the compass housing, according to the numbers on the housing. Now, finally, the direction of travel-arrow points in the direction you want to go. Again, be careful to aim at some distant object and off you go.
You may not need to find the declination before you leave home, actually. There is a fast and pretty good method to find the declination wherever you are. This method has also the advantage that corrects for local conditions that may be present (I am thankful towards Jim Cross who pointed this out to me). This is what you do:
- Determine by map inspection the grid azimuth from your location to a knowable, visible, distant point. The further away, the more accurate it gets. This means you have to know where you are and be pretty sure about one other feature in the terrain.
- Sight on that distant point with the compass and note the magnetic azimuth. You do that by turning the compass housing so that it is aligned with the needle. You may now read the number from the housing where it meets the base of the direction of travel-arrow.
- Compare the two azimuths. The difference is the declination.
- Update as necessary. You shouldn't need to do this very often unless you travel in terrain with lots of mineral deposits.
There are a few riddles and rhymes to help you remember whether you should add or subtract. I don't know them. If you live in an area where you don't go far for it to change between east and west, it is so small you wouldn't need to worry about it anyway. So it's best to just remember whether you should add or subtract.
Uncertainty
You can't always expect to hit exactly what you are looking for. In fact, you must expect to get a little off course.
How much you get off course depends very often on the things around you. How dense the forest is, fog, visibility is a keyword. And of course, it depends on how accurate you are. You do make things better by being careful when you take out a course, and it is important to aim as far ahead as you can see.
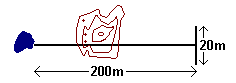 In normal forest conditions we say that as a rule of thumb, the uncertainty is one-tenth of the distance traveled. So if it is like in the figure, you go 200 meters on course, it is possible that you end up a little off course, 20 meters or so. If you're looking for something smaller than 20 meters across, there is a chance you'll miss. If you want to hit that rock in our example you'll need to keep the eyes open!
In the open mountain areas, things are of course a lot easier when you can see far ahead of you.
This was the last of the lessons you should know. But more lessons are upcoming. Now it is time to log out and get into the backyard, and then backcountry. Try it out! That is, after all, the only way to learn this properly. Good Luck!
I said navigating in the mountains is easier. Well, that is until the fog comes. Fog can make orienteering in the mountains and in the forest extremely difficult, and therefore, it can also be dangerous to the inexperienced. The principles of orienteering are still the same, but there are a few hints in the next lesson that will help you get trained.
How to use a compass
How to navigate in foggy conditions
Fog makes things difficult, and in some situations dangerous. When you hike, you will probably some day experience these difficulties, and you'd better be prepared.
The fog can come creeping very fast. I have myself experienced from clear view to dense fog in 10 seconds. How fast this goes, depends on where you are.
In normal summer conditions without snow, it is often not much of a problem. Unless you are supposed to find a hut or something. The ground provides normally so much contrast,. just be very careful and accurate. Perhaps you also might use some of the advice given later.
Winter conditions can make things a lot worse, when there is snow on the ground. The fog is white (or grey), the snow is also white. You may get a condition we call a white-out It's too late to read the terrain, and then the map isn't of much use. You can't see anything anyway. You have no choice but to put blind faith in your compass. I hope you knew where you were, because you need to take out a good compass course, like described in the other lessons. If you are skiing, you should tie your compass to your arm or something, so you can look at it for every step you take. A rubberband is good. Check for more or less every step you take that the compass needle is aligned with the orienting lines. But if it is cold, make sure it doesn't affect circulation of blood in your arm, because that will make you freeze. If you are going on an expedition where you expect conditions like this, you should perhaps consider a arrangement to attach to your chest.
Let's consider a method to enhance the accuracy in conditions when you can't aim at anything. If you are three persons in a row, like on the figure, and the last one carries a compass (of course, it is better that all three carry a compass, but the last one has command), he or she will see if you get off course because one of those in front of him or her will not be covered by the person in front. On the figure, the situation to the left is ok. The person on top is heading forward and but he sees only the person in front of him or her. In the situation to the right, it's time to stop. The last person can see the backs of both of them in front, and they are about to leave their course.
The further apart you go, the more accurate this method is, but it is also very important to have good contact. Sometimes the conditions get so bad there is no way to maintain contact, and then, the method may fail.
There is also another method for two people, where the lead person goes out on a compass azimuth, as far as the visibility will allow. The person behind stands still and watches the lead person, telling them if they are in the correct line or not. Once they have moved correctly into line they then stand still and the back person joins them. They then have their turn to move out ahead on the azimuth, and the whole cycle repeats. The problem with this method is when the visibility is very bad, the lead person can't go more that a few meters, and it would be dangerous to loose each other.
Finally, I'd like to comment on something that is seen in many standard texts on mountaineering navigation: You are commonly taught to use methods that use terrain features that are easily recognizable but far away. In my opinion, such methods are of little use, unless you require surveyor's accuracy in knowing where you are (hikers rarely do). As long as the weather is good, navigation is fairly easy and you'll naturally use these features as part of a more general approach. However, when the visibility is poor, you can't see these far-away-features and this makes the methods involving them rather useless. Therefore, focus your training in navigation on using features in your vicinity.
How to use a compass (Lesson 2)
Using the compass in interaction with a map
This is the important lesson, and you should learn it well.
It's when you use both compass and map the compass is really good, and you will be able to navigate safely and accurately in terrain you've never been before without following trails. But it'll take some training and experience, though.
I am not covering map reading here, guess you would have to consult other sources for that, but the lesson will be useful if you have a sense of what a map says.
First, a quick summary of what you will learn in this lesson:
- Align the edge of the compass with the starting and finishing point.
- Rotate the compass housing until the orienting arrow and lines point N on the map.
- Rotate the map and compass together until the red end of the compass needle points north.
- Follow the direction of travel arrow on the compass, keeping the needle aligned with the orienting arrow on the housing.
Here is our compass again:
The principles are much the same as in lesson 1 but this time, you are using the map to tell you which way is correct instead of your intuition.
Take a map. In our first example, we look at a map made for orienteering, and it is very detailed. Well, not really. We look at a fictitious map I drew myself, but never mind. To the point. 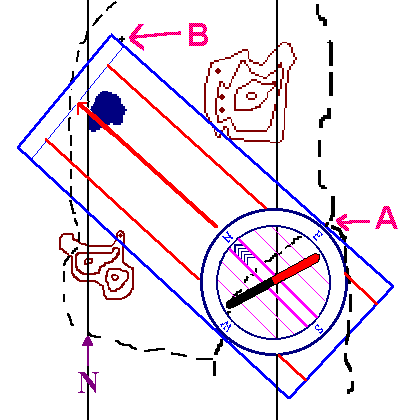
You want to go from the trail-crossing at A, to the rock at B. Of course, to use this method successfully, you'll have to know you really are at A.
What you do, is that you put your compass on the map so that the edge of the compass is at A. The edge you must be using, is the edge that is parallel to the direction of travel arrow. And then, put B somewhere along the same edge, like it is on the drawing. Of course, you could use the direction arrow itself, or one of the parallel lines, but usually, it's more convenient to use the edge. At this point, some instructors say that you should use a pencil and draw a line along your course. I would recommend against it. First, it takes a lot of time, but offers no enhancement in accuracy of the method. Second, if you have wet weather, it may destroy your map, or if it is windy, you may loose it. You should keep your map (preferably in a sealed) transparent plastic bag, and if it is windy, tied up, so it can't blow away. But most important is that any drawings may hide important details on the map.
CAUTION!Time to be careful again! The edge of the compass, or rather the direction arrow, must point from A to B! And again, if you do t his wrong, you'll walk off in the exact opposite direction of what you want. So take a second look. Beginners often make this mistake as well.
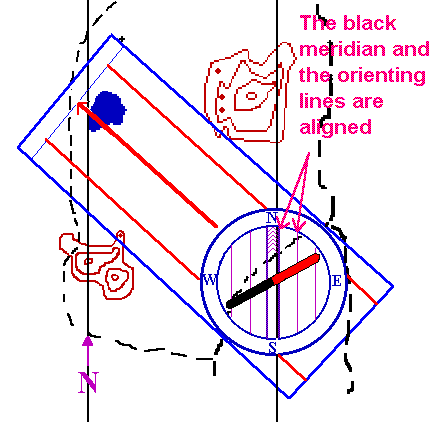 Keep the compass steady on the map. What you are going to do next is that you are going to align the orienting lines and the orienting arrow with the meridian lines of the map. The lines on the map going north, that is. While you have the edge of the compass carefully aligned from A to B, turn the compass housing so that the orienting lines in the compass housing are aligned with the meridian lines on the map. During this process, you don't mind what happens to the compass needle.
There are a number of serious mistakes that can be made here. Let's take the problem with going in the opposite direction first. Be absolutely certain that you know where north is on the map, and be sure that the orienting arrow is pointing towards the north on the map. Normally, north will be up on the map. The possible mistake is to let the orienting arrow point towards the south on the map.
And then, keep an eye on the the edge of the compass. If the edge isn't going along the line from A to B when you have finished turning the compass housing, you will have an error in your direction, and it can take you off your course.
When you are sure you have the compass housing right, you may take the compass away from the map. And now, you can in fact read the azimuth off the housing, from where the housing meets the direction arrow.
Be sure that the housing doesn't turn, before you reach your target B!
The final step is similiar to what you did in lesson 1. Hold the compass in your hand. And now you'll have to hold it quite flat, so that the compass needle can turn. Then turn yourself, your hand, the entire compass, just make sure the compass housing doesn't turn, and turn it until the compass needle is aligned with the lines inside the compass housing.
The mistake is again to let the compass needle point towards the south. The red part of the compass needle must point at north in the compass housing, or you'll go in the opposite direction.
It's time to walk off. But to do that with optimal accuracy, you'll have to do that in a special way as well.
Hold the compass in your hand, with the needle well aligned with the orienting arrow. 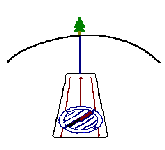 Then aim, as careful as you can, in the direction the direction of travel-arrow is pointing. Fix your eye on some special feature in the terrain as far as you can see in the direction. Then go there. Be sure as you go that the compass housing doesn't turn.
If you're in a dense forest, you might need to aim several times. Hopefully, you will reach your target B when you do this..
Unfortunately, sometimes, for some quite often, it is even more complicated. There is something called
magnetic declination
. And then, for hiking, you wouldn't use orienteering maps. And this is the issue for lesson 3
How to use a compass
Finding the directions without a compass
You are lost. I mean really lost. Standing in the middle of nowhere, and you have no idea where to go. If you are really in trouble, remember two things first of all: stay calm, think rationally, and you can survive a long time without food. What you need is to drink.
Further thoughts about extreme survival skills is beyond the scope of this page, seek advice elsewhere beyond this introduction. This page deals with the situation of finding your way, without the aid of a compass. What you have, is the sun, the stars, and the nature around you.
This page is mainly about the northern hemisphere of the earth, actually north of 23.5 °, because I have never been to the southern hemisphere myself (would like to go there of course!). The methods described do of course apply to the southern hemisphere as well, but in some places there may be a need to swap north and south to get it right. I hope you are able to figure it out.
For a start, it may be a good idea to climb a hill, and get a good look around. Try to see traces of human activity. If you see nothing, you should try to figure out in what direction would be the best to travel. If you haven't got a map, try to draw one if you can of the terrain in front of you, and try to mark off where north is, using the methods below. If you have got a map, try to determine where you are. Remember, you don't want to climb more hills than you have to. Also you should carefully consider not to climb if you are very tired. In that case you should consider staying where you are. Consult other sources for information on how to make it easy for rescuers.
Let us start with the most accurate method. This method requires that you have a pretty clear sky, though, and takes a lot of time. One of the advantages is that you don't need any equipment. You would need a straight pole about 1 meter (or a yard) long, two small sticks or rocks, another stick (or rock) that needs to be a little sharp, and something that can act as a string.
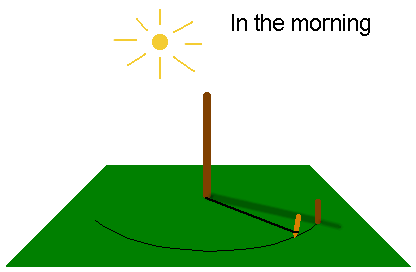 In the morning, at least before noon, the trick starts. Stick the long pole in the ground, upright. The ground around the pole needs to be horizontal. Now, you can place one of the little sticks in the ground exactly where the shadow of the pole ends, like on the figure. Then tie the string to the base of the pole, and tie the little, sharp stick, to the other end, so that when the string is stretched it reaches exactly the little stick standing there in the soil. Then, scratch half a circle in the soil with your sharp little stick, and wait... Wait. Wait until the evening. During the day, the shadow will get shorter and shorter, until noon, when it gets longer again. At noon, when the shadow is at its shortest, you may want to mark the point. The shadow is now pointing north (if you are north of 23.5 ° north). It is however not very easy to see exactly when this is, but it is useful anyway. Finally, the shadow reaches your circle again, and when it does, place your other little stick at the spot where the shadow ends. If you haven't got a string, you could use a pole that has the right length, or try to come up with some other improvised solution. Just make sure what you draw is a circle.
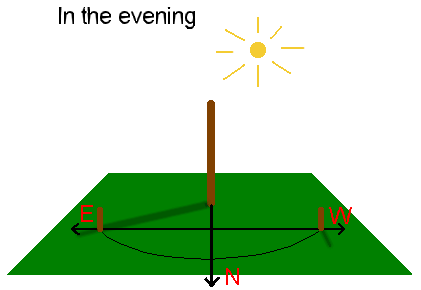 Now, the line from the first stick to the second is west-east, like on the figure. Actually, you may want to mark points regurlarly, because any two points that have exactly the same distance from the base of the pole will give the West-East line. If it is partly cloudy, this may be a good idea.
There is a short, fast version of this one as well. This is only approximate, though, and the further away from the equator you get, the more inaccurate is it. You don't need the sharp stick and the string. Just wait 20 minutes between placing each of the sticks, and the line between the two sticks will be approximately west-east, like on the figure. Often, you wouldn't need anything more accurate.
At night, you can navigate after the stars. You should, however, be careful with walking, it is easy to stumble and fall and get injured, and also easy to lose sight of the stars as you go, and you might start going around in circles. Often it will also be more physically and mentally demanding. 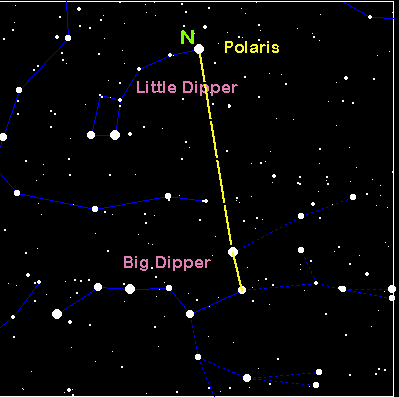 In the northern hemisphere, there is a star that is almost exactly in the north at all times, the Polaris. It is pretty easy to find, if you know the "Big Dipper". (Everybody knows the Big Dipper (or the Plough)?) Take the two stars at the end of the "Big Dipper", and make an imaginary line "upwards", and extend it five times the distance between the two stars. There you have it - Polaris. That way is always north. The figure is courtesy of Kathy Miles. Used with permission.
In the southern hemisphere, you would have to find the Southern Cross. Because I haven't been south of the equator, I can't help you find it, make someone tell you where it is right now, if you don't know it already. That way is south.
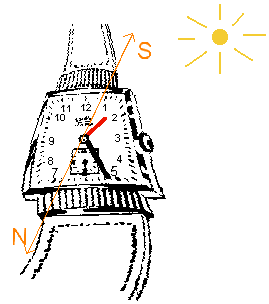 If you have an analog wrist watch, you can use the time to find north. Hold your watch up in front of you, and let the short hand, red on the figure, that indicates hours point at the sun. While holding it like this, cut the angle between the red arrow and 12 o'clock in two, (noonwards if the time is before 6am or after 6pm), that way is south. (The reason you need to cut it in two, is because the clock takes two rotations while the sun takes one around the earth, it is of course the other way around, but never mind.)
Many people wear digital watches these days (I do myself, if I wear one at all). If you do, draw an analog watch face on a piece of paper, and then mark the hour hand on using the digital watch. The rest of the method is identical.
This method can be used even when it is pretty foggy. Although you may not be able to see the sun, it may still cast a shadow. If you take up a straw or a tiny stick, and you may see a shadow. You just have to remember that the shadow points the opposite way from the sun, but the rest of it is quite similar as above.
 Want to make your own compass? Sure. You need a needle and a glass of water. A needle can in fact float on the water, or that is, on the surface tension forces if put carefully on the surface. Just put it carefully down on the surface of the water. This demands a lot of patience though. There are three tricks that makes it go easier. One: Put the needle on a piece of paper. If the paper floats too, there is no problem, and if the paper sinks, it'll probably leave the needle. If you put some grease on the needle that isn't water-based, it'll go easier, or if you put it carefully down with a fork or something. Once it has got there, it stays there pretty good.
If the needle is magnetic, it will act as a normal compass and be very accurate. A problem is though, that you don't know north from south. All you know is that it lays north-south. You would have to use one of the other techniques to find out, or make a good guess.
The greatest problem with this is: Not many needles are made of magnetic materials these days.... You can't just use any needle. You may just have to look around to see what you can find, if you want to make a yourself a compass.
What if there is no shadow? Then, there are a few methods based on natural signs. I will deal with the ones I have checked myself.
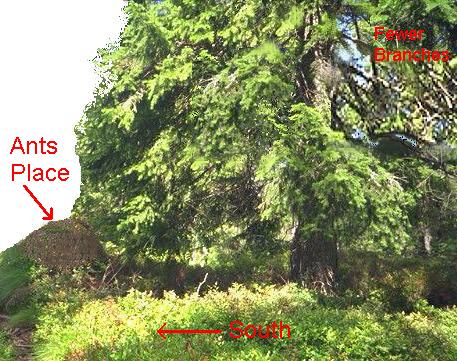
It is very much about trees. First of all, there will be fewer branches to the north. This is usually easiest to see if you look up along the trunk of the tree. The north face of the tree would be more humid than the south face, which is something most species of lichen (or moss) likes, and consequently, there will be more of it on the north face. On the image above, you can also see that ants likes to build their nests on the south side of the tree.
It is also worthwhile to look at how snow melts. In the spring in the mountains, snow will melt faster on the south face of rocks, or in south faced slopes. Also, vegetation and undergrowth will typically be thicker on the South facing slopes, and also fruits ripen earlier on the South facing slopes.
These methods are not very reliable, I am afraid. Winds may alter the average conditions significantly, and cause deviations. If you use natural signs, you should use as many signs as you can before you draw a conclusion.
How to use a compass
Suggested Exercises
OK, so I read the pages, and I am going to teach kids this, what do I do? This page has a few suggested exercises, and this page is intended for coaches and educators who have themselves some experience. Anybody can be taught using this page, of course, but it is principally aimed at teaching kids.
First, there are some very important considerations to make. The feeling of being lost is something that may be very stressful to a child, and if stressed too much, a child may never learn to love the backcountry. Some children are perfectly capable of coping with the feeling of being lost, for others coping with this feeling may take a very long time, but once achieved I believe it is a considerable survival skill that may help save somebody's life some day.
As a coach, you need to be aware of this situation, and be very cautious until you know the children you are coaching. It is of great importance that the exercises in the forest are planned with this in mind.
Now to the exercises: For the absolute beginners, it is important that they master the techniques described in lesson 1 and 2. This can be done partially with practise without going anywhere, but that gets boring pretty fast, you could let the kids do it a few times. In this first exercise the aim is solely to choose the right control from several you can see. This way, you get practise, but need not fear getting lost. It requires some work done, however. Check out this figure:
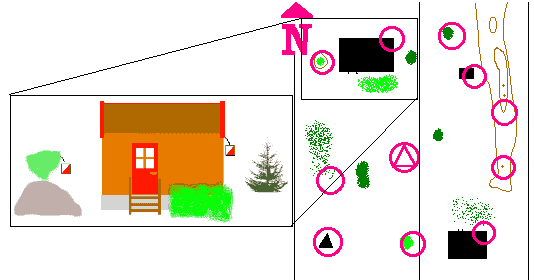
To the right is a map of your backyard. In the middle is a symbol

, which is a symbol used in orienteering to denote start and finish when they are at the same place (Othervise, start is a triangle, and finish two concentric circles). There are controls all around you, and all of them can be seen from this center. A control, as used in orienteering, looks like

, and they are placed in all the circles. The map here is of course an imaginary map, and you would have to draw a map of your own back yard. The scale isn't very important, but it has to be correct with regards to the compass. Also on the figure above is a detail from the upper left corner of the map as it would look in the real (imaginary...) world. You should draw all buildings, large rocks, bushes and trees and other features you see, like you see from the detail.
The kids are going to choose the right control using the map you drew, and the compass. The first time you do this, you should take your time, and help each one of the kids with taking the compass course. When they have taken the course, they decide which control is the right one, run or walk up to it, and come back. Then they do the same with the next control. The sequence each kid does this, is however, unique.
The second time, it is time to do some more fun. Here is one example. Make it a treasure hunt! This is the plan: At each control, put a bag of some treasure on the control, one for each kid and unique to the control. Take for example, starting in the upper left corner by the north arrow, a bag of bananas by the bushes, a bag of oranges by the corner of the house, a bag of apples by the tree and so on. Each one of the kids is going to fetch the treasures, in a unique sequence, as fast as they canstrating point between each control. The controls are numbered, and each kid gets the sequence he or she is going to run to the controls in, and which treasure is at which control, so if he or she finds the wrong type of treasure, he or she knows it is the wrong control. You are standing there checking everybody got the right sequence. Which means you get a hard time... This is going to be chaotic, everybody running in different directions, and chaos is fun!
For small kids, it is important that everybody is a winner, and although somebody is going to be fastest, nobody is a loser when they get all these treasures.
There are of course, many possible variations of this method, relays, take as many treasures as you can in a specified time, and so on. Lots of fun! You should continue with variations of this method, maybe taking them out in the forest, until everybody feels confident they can use the compass safely and accurately, This may take some time. In a proper orienteering course, compass usage is of course only a small part of it. Consequently, you may use the two first exercises (this one and the next), for the compass part of the course for a full year, but with variations of course.
Let's move to the bush. Compass usage is most important when you haven't got any other features to guide you, such as paths, streams etc. So to get proper training, the kids have to go where they don't follow paths and such. This makes things more difficult, of course, and it is easier to get lost. Which means we are talking about the feared "feeling of being lost". Therefore, it is essential, assuming the kids have not yet got all the confidence they need to be out there completely on their own, to plan the exercises with a "security net", so that they cannot get really lost. This is achieved by ensuring there are features like roads, large paths, streams etc. that they can't miss, if (when) they miss the control.
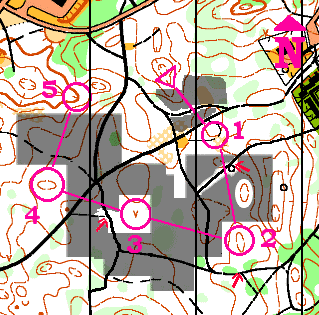
 It may be a good idea to put the start at a point that is visible from quite a distance, like a tower, for instance (the 'T' in the start symbol means tower). This time, the place you use should be covered by a real map, preferably with a large scale. Two controls are indicated as examples. Neither of the controls are visible from the start, which means the kids would need to use more techniques to get there. Before you start, you would need to instruct the kids what to do if the miss the control. If they think they cannot go right back to the start, they should just proceed until they find the road, and take one of the large paths back.
While only two controls are indicated here, there are supposed to be controls all the way around, like in the previous example. And also like in the previous example, they are supposed to run back and forth. The distance from the start should be around 100 meters, and must not be more than 200 meters.
The first times you are out this way, it may be a good idea to follow the kids around. In this case, you may not need to go back and forth, but go a course with 100-200 meters between the controls. Let the kids do the orienteering. Then you can again arrange treasure hunts, relays and such as the kids run back and forth. As the kids build up confidence, some will surely do this faster than others, they may take two controls for each time they run out, so they won't have to run the same path back and forth.
Hopefully, during this process, the kids will build up confidence in themselves, and know what to do when they miss. Eventually, they will be able to cope with the feeling of being lost, and then they may proceed to greater challenges.
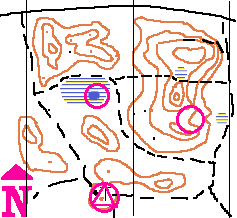
 This is the greater challenge. This is a real orientering map, which illustrates how one uses a black pen to make parts of the map unreadible, which forces the runner to use the compass. In general, this method is regarded too difficult for beginners, but I have made some simplifying additions to the method, so I believe it is now appropriate for second-year beginners. It is, however, important that the kids have learned to cope with the feeling of being lost, it is nothing they fear anymore, because anybody who uses this method will get lost once in a while.
As you can see, I have made a course on the map, and there are different levels of difficulty associated with each of the controls. The first control is the easiest. One crosses several roads and paths on the way to the control, and there are paths leading into the control from each side. The crossing of roads has mainly two purposes: The child can see how far he or she has got, and secondly, it helps to build confidence. It doesn't play a very important role in finding the control, because the compass is supposed to play the main role in that. It can be used to correct the bearing if it is obviously wrong though. The control has also a "security net" - the road just after the control. If the control is missed, it provides a way to get back in, a detail that cannot easily be mistaken. The red arrow indicates such a detail.
The second control is a little more difficult. There are, contrary to the first control, few crossings. A few details are allowed to be visible though, so that the child can check his or her bearing and make sure he or she hasn't gone very wrong. The control has still a security net, the red arrow indicates a good place to get into it again.
The third control has only the security net left, even the road that is crossed is blacked out. This is pretty difficult, and suited to teens that are getting experienced are about to move up to more difficult courses.
So is the fourth control. The kids who can run courses with this kind of controls are confident in the forest, has already been doing a lot of missing, and has analytical experience enough to find back without aid.
The fifth control is a control that may be good for experienced orienteers for this kind of training.
For all levels, the distance between controls shouldn't be more than 200 meters, a good deal less for the kids. This map has been enlarged for instructional purpose. Also, the blackout here is somewhat transparent, this is also for instructional purpose. In a real exercise, it should be completely black where it is grey here.
“OTHER PLANETâ€
FLAG CEREMONY
Cubmaster is in astronaut gear, den
chiefs/den leaders dressed as aliens. The
Cubmaster is trying to put the flag on this
new planet. The aliens are curious about
what he is doing and ask him lots of
questions. What is that? What is he
doing with it? Where he is from? All
questions lead to the fact that he is
putting the flag on this planet to claim it
for the USA and Cub Scout Pack ____.
The last remark would be, “I hereby
claim this planet for the USA and Packnotes
____. Please join me in the pledge.
 Â Â Â Â Â Â Â Â Â Â Â Â Â Â Â Â Â Â Â Â Â Â Â Â Â
   “WHAT WILL WE HAVE
IN THE FUTURE?â€
Could be Gathering or opening.
Ask everyone to think of something that will
change in the future and tell about it
(something that will be different in the next
40 years). For instance, will we all have a
cellular phone number assigned to us at birth
that we will keep our whole lives? What
about worldwide money? Will we eliminate
the electric cord so all appliances will be
cordless? Will your property be enclosed in
a clear bubble so it will be like summer all
year? What do you think the future will be
like?
 CUBMASTER MINUTE--“TIDBITSâ€
• Living on Earth is expensive, but it does include a free
trip around the sun every year
• How long a minute is depends on what side of the
bathroom door you're on.
• Birthdays are good for you; the more you have-- the
longer you live.
• Happiness comes through doors you didn't even know
you left open.
Ever notice that the people who are late are often much
jollier than the people who have to wait for them?
• Some mistakes are too much fun to only make once.
• A truly happy person is one who can enjoy the scenery on a detour.
• We could learn a lot from crayons: some are sharp, some are pretty, some are dull, some
have weird names, and all are different colors, but they all exist very nicely in the same
box.
Â