Cubmaster: Cub Scouts, Parents, and Leaders, we are here tonight to honor No. of our Webelos Scouts, who are to come before this Pack to be presented with the highest award in the Cub Scout program, the Arrow of Light.
Akela: Akela was the Big Chief of the Webelos tribe; tall, stalwart, straight as an arrow, swift as an antelope, brave as a lion. He was fierce to an enemy but kind to a brother. Many trophies hung in his teepee. His father was the son of the great yellow sun in the sky. His totem was the Arrow of Light.
Cubmaster: Will the following Webelos Scouts please come forward.
(Cubmaster is standing behind the Arrow of Lightboard and boys will be facing him)notes
Cubmaster: The emblem you see before you represents the Arrow of Light. The seven candles represent the rays in the Arrow of Light. These candles also represent the Seven Virtues of Life.
(Cubmaster then lights each of the candles one at a time and says):
1. This candle represents Wisdom
2. This candle represents Courage
3. This candle represents Self-Control
4. This candle represents Justice
5. This candle represents Faith
6. This candle represents Hope
7. This candle represents Love.
Akela: And the largest candle of them all represents the "Spirit of Akela"
(He then lights the candle)
Cubmaster: If you live by the seven great virtues and the "Spirit of Akela" you will become a happy man and a happy man is a successful man.
(At this time the boys turn and face the audience so parents will be facing the audience too)
Will the parents of these Webelos Scouts please come and stand behind your son.
Present the leader with the Arrow of Light to give to the Webelos.
Source: Greater Alabama Council
Personalize your drink coasters with this excellent themed craft. Your kids can customize them for special occasions like New Year, Christmas, Thanksgiving, Hanukkah, and more.
What you'll need:
How to make it:
- Open the graphics software and choose Avery Kids #03111 Square Stickers as the format.
- Design the coaster to match the celebration that you are having.
- Add photos to the coasters if you would like a personalized coaster for each guest.
- Print out the stickers, and let dry.
- Peel off stickers, and apply them to cardboard.
- Cut around stickers.
- Apply Con-Tact paper on the top and the bottom of the coasters. Be sure to leave enough Con-Tact paper around the coaster to seal it from spills.
- Set out and enjoy the compliments.
-
Pioneering hazards
https://scoutpioneering.com/tag/pioneering-safety/
There are only good outcomes to including Pioneering as a necessary part of the Scouting program, and when presented appropriately, there are only good results
As you begin your pioneering lesson, safety must come first. There are many things to remember as you begin the pioneering lesson. There can be no substitute for appropriate behavior and having common sense. Safety should always be foremost in your mind. If you follow the link above it presents many good safety points that are necessary points to continuously be thinking about.
-
Different types of ropes, their strengths, and when to use which
https://scoutpioneering.com/tag/best-rope-for-pioneering/
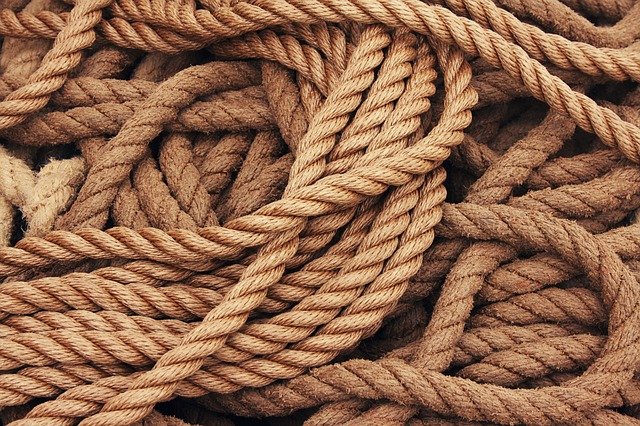
The best all-around rope to use for pioneering projects is pure manila, three-strand, twisted. All ropes in your pioneering kit should be whipped on both ends. In the case of plastic rope, whether it’s twisted or braided, it must be first melted back and then whipped.
https://scoutpioneering.com/2013/02/09/rope/
There are several important factors to consider when selecting the kind and size of rope to use in pioneering and camping activities. Three of the most important factors to consider are the strength in both the working load and breaking point of the rope, the stretch factor of the rope, and how easily the rope handles. Some other considerations are the rope’s resistance to mildew, its ability to stand up to repeated wetting and drying, and whether or not it retains kinks from knots after having been under a hard strain, making it difficult to use a second time.
-
How to store rope
https://ropeandcord.com/guides-ideas/how-to-store-rope-and-cord/
There are simple ways to keep your rope from tangling or becoming ruined while it's not in use. From helpful tips to complex knots and coiling methods, you can find the best way to store your various types of ropes and cords. One of the best ways to store your rope is in a tote, bag, or another kind of container, so it is off the ground and away from dirt, chemicals, and objects that could cause damage. The cording should be away from fire hazards (i.e. sparks, sources of ignition, embers), bleach, moisture, and acids as well.
-
Fuse rope (candles)
Here is a good video to show how to fuse various ropes with differing methods.
-
Whip rope (west country and basic)
https://scoutpioneering.com/tag/west-country-whipping/
Preventing the ends of the rope from fraying is a process referred to as “whipping.” Learning how to whip the ends of a rope is one of the early requirements on the Scouts BSA advancement trail. There are many different methods used to whip a rope. One of the most popular is known as the West Country Whipping. What’s so special about this whipping? The answer is easy. It’s simple to teach, and most importantly, it’s easy to make tight! Therefore, Scouts learn it sooner and enjoy it a lot more.
-
Overhand
Learn how to tie the Overhand Knot in a simple step-by-step video. By AnimatedKnots.com - the world's #1 knot site. Click on the link above to understand better.
-
Thieves knot challenge
IMG NEEDED
https://www.troop650bsa.org/files/knotmaster.pdf
No, it is not a square knot. This knot is not really practical, but it is an interesting knot. I've heard that sailors used to use this knot to tie the pull straps that closed the bags with their personal belongings. If the owner later returned and found a square knot instead of the thief’s knot, he/she knew that someone else (a thief) had untied the thief's knot, rummaged through the bag, and retied a square knot to close it.
-
Square knot
https://troopresources.scouting.org/square-knot-visual-approach/
The square knot (Reef Knot) is primarily a binding knot, used to secure a rope or line around an object. Using a visual approach to tie the second half knot is a sure-fire way to assure it will always be tied correctly. Use the video by clicking on the link below.
-
2 half hitch
Here is a video from Cub Scout Eric:
And another from Survival knots: to show you how to make a 2 half hitch knot correctly.
-
Larks head
Here is a video about tying this know correctly from the BSA: The lark’s head is made up of two half hitches tied in opposite directions (see above video).
-
Taut line
Here is a video about tying this know correctly from the BSA:
https://www.scouterlife.com/blog/2019/10/8/taut-line-hitch The taut-line hitch is used to increase the tension on your tent or dinning fly line when needed. The knot is easily able to slide on the guy line, and is tied in such a way that it creates a jam when the tension is present. This is the ScoutsBSA recommended knot for an adjustable sliding knot.
-
Roundturn w/ 2 half hitch (2 wraps around pole then 2 half hitch)
Here is a video about tying this know correctly from Survival on Purpose:
https://eoceanic.com/sailing/tips/16/135/a_very_useful_general_purpose_knot_the_round_turn_and_two_half_hitches/ The round turn and two half hitches knot is a very useful knot used to secure the end of a rope to a fixed object. The name refers to the components used to form the knot, a round turn wraps the rope around the object completely encircling it twice and the two half hitches secure the end around the standing part.
-
Clove Hitch
Here is a video about tying this know correctly from Survival on Purpose:
https://en.wikipedia.org/wiki/Clove_hitch A clove hitch is two successive half-hitches around an object. It is most effectively used as a crossing knot. It can be used as a binding knot but is not particularly secure in that role. It is typically used in securing lines running along with a series of posts, belaying, starting lashings, weak binding
-
Rolling Hitch (clove hitch with extra turn IE round turn than clove hitch)
Here is a video about tying this know correctly from the BSA:
https://megscoutguide.nic.in/rolling-hitch#:~:text=One%20of%20the%20most%20underated,hitch%20with%20an%20additional%20turn. One of the most underrated knots in Scouting and Guiding, the Rolling hitch is used to attach one rope to a second, in such a manner that the first rope can be easily slid along the second. The knot can be considered a Clove hitch with an additional turn.
-
Figure 8
Here is a video to help you tie this knot correctly.
https://scoutwiki.scouts.org.za/wiki/Figure_of_eight_knot The figure-eight or figure-of-eight knot is also called (in books) the Flemish knot. The name figure-of-eight knot appears in Lever's Sheet Anchor; or, a Key to Rigging (London, 1808). The word "of" is nowadays usually omitted. The knot is the sailor's common single-strand stopper knot and is tied in the ends of tackle falls and running rigging unless the latter is fitted with monkey's tails. It is used about ship wherever a temporary stopper knot is required. The figure-eight is much easier to untie than the overhand, it does not have the same tendency to jam and so injure the fiber, and is larger, stronger, and equally secure. The Ashley Book of Knots
-
Sheetbend
Here is a video to help you tie this knot correctly.
https://scoutlife.org/video-audio/147829/how-to-tie-the-sheet-bend-knot/ The sheet bend won’t slip when ropes of dissimilar material and sizes are tied together.
-
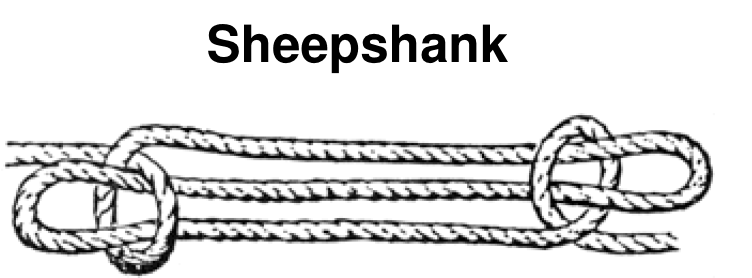
Sheepshank
Here is a video to help you tie this knot correctly.
https://www.animatedknots.com/sheepshank-knot Sheepshank knots provide loops, shortens or removes slack from a rope, and bypasses a frayed section of rope
-
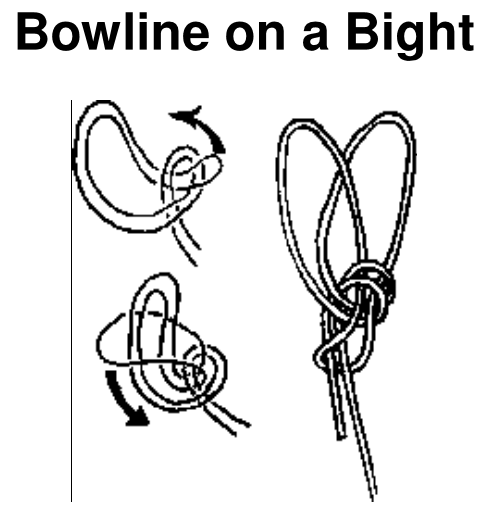
Bowline
Here is a video about tying this know correctly from Survival on Purpose:
https://247scouting.com/web/BSA160/attachment/document_15172634230_2939.pdf The bowline is used to make a non-slip loop on the end of a rope. It is called the king of knots and it is so dependable that it can be used for rescue work. Here is how to tie it around a vertical post.
-
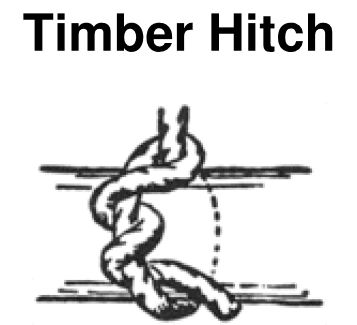
Timber Hitch
Here is a video about tying this know correctly from Survival on Purpose:
https://247scouting.com/web/BSA160/attachment/document_15172634230_2939.pdf A timber hitch ties a rope to a piece of wood; it is intentionally difficult to undo. Use a timber hitch to secure a line to a tree, a log, or to drag a log along the ground. The timber hitch is used to start a diagonal lashing (see below).
-
Butterfly knot
Here is a video to help you tie this knot correctly.
https://troopresources.scouting.org/butterfly-knot/ In Scout Pioneering, we frequently use a butterfly knot to form the fixed loop in a rope tackle — a very useful knot!
-
Water knot (similar to overhand in a bite but done with 2 different ropes)
Here is a video about tying this know correctly from the BSA:
https://scoutpioneering.com/tag/water-knot/ In pioneering, whenever you're using ropes made of man-made fibers that are braided and slick and don't hold knots well, think of the water knot. To tie together the ends of two wet or slippery ropes. ... Keep in mind that once strain is put on the knot, it will be hard to untie. To tie together the ends of halyards.
-
Carrick bend
Here is a video about tying this know correctly from the BSA:
https://troopresources.scouting.org/carrick-bend-further-information/ The carrick bend's main function is to join the ends of large diameter lines that are stiff and not at all easy to form into other common bends. In these instances, the knot can be left in its elongated form and the ends are seized to their standing part.
-
1 handed bowline
Here is a video about tying this know correctly from the Shepherd School:
https://www.animatedknots.com/one-handed-bowline-knot The One-Handed Bowline is a quick, useful way to tie a bowline when the other hand is occupied or injured.
-
Coil rope & bowline rescue
Click on this link for an animated how to coil a rope: https://www.animatedknots.com/coil-unattached-rope-knot
Here is a YouTube video about creating the bowline rescue knot:
https://www.animatedknots.com/bowline-knot The Bowline makes a reasonably secure loop at the end of a piece of rope. It has many uses, e.g., to fasten a mooring line to a ring or a post. Under load, it does not slip or bind. With no load, it can be untied easily. Two bowlines can be linked together to join two ropes. Its principal shortcoming is that it cannot be tied, or untied when there is a load on the standing end. It should therefore be avoided when, for example, a mooring line may have to be released under load.
-
Revisit any knots the Scouts still need help with
-
Make rope
Here is a video to show you how to make rope:
https://scoutpioneering.com/tag/making-a-rope-maker/ Another device that can be used to make rope is fashioned after the ropemaker used on farms during the early 1900s. With it, you can twist the three yarns on each hook into a strand, and the three strands into a rope all at the same time.
-
Tripod lashing
Here is a video from the Boy Scouts about performing this knot correctly:
http://www.bsatroop1424.com/skills/scouting-skills-tripod-lashing/ A tripod can be used to support a load such as a water jug, camping stove, etc.
-
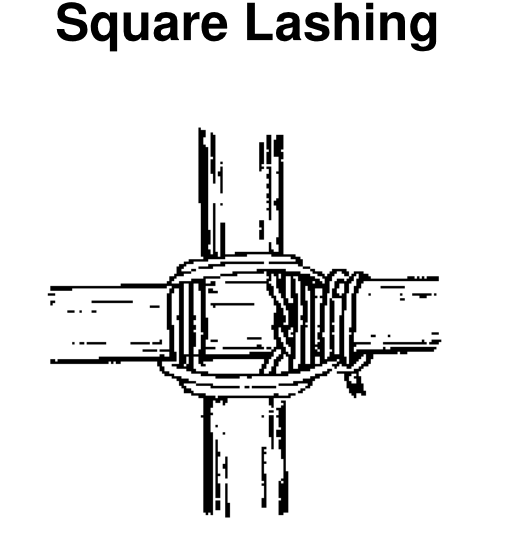
Square lashing
Here is a video from the Boy Scouts about performing this knot correctly:
https://blog.scoutingmagazine.org/2019/10/10/how-to-complete-a-square-lashing The most common and frequently used lashing is the square lashing, which gets its name from the fact the wraps are “square” to the poles. Square lashings bind poles that are in contact and cross each other at any angle from 45-degrees to 90-degrees. There are various types of square lashings, and when tied tightly and correctly, they all do the job. Most commonly used in the pioneering area at our national jamborees is the Mark II Square Lashing, which has been widely adopted for its simplicity, speed, and efficiency.
-
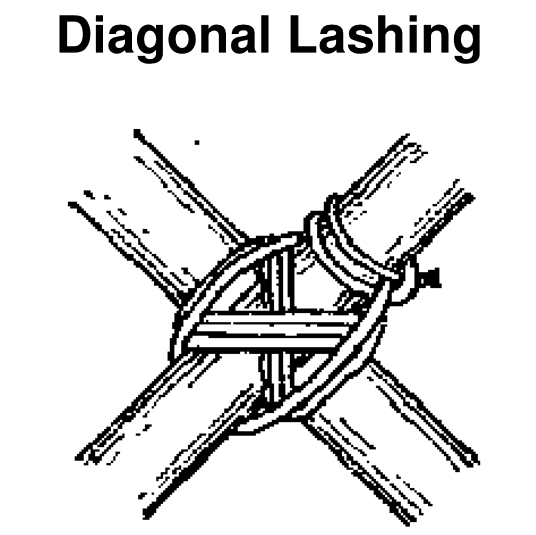
Diagonal lashings
Here is a video to help you tie this knot correctly from Survival on Purpose:
https://www.jerseyshorescouts.org/files/11309/Webelos-Lashing-Skills-pdf The diagonal lashing gets its name from the fact that the wrapping turns cross the poles diagonally. The diagonal lashing can be used to bind poles that cross each other from 90° to 45°. If the angle between the poles is less than 45° a shear lashing should be used.
-
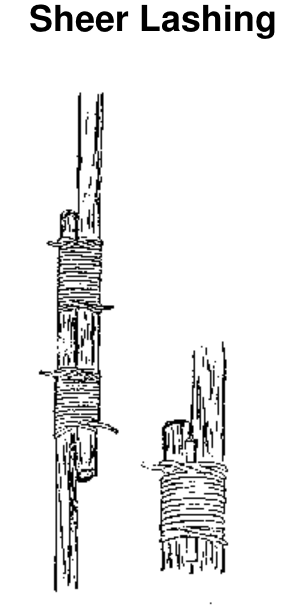
Shear lashing
Here is a video to help you tie this knot correctly from Survival on Purpose:
https://scoutpioneering.com/tag/shear-lashing/ To create this knot start off the lashing with a clove hitch around one pole. Then wrap the lashing rope eight to ten times around both poles. Next, take two frapping turns between the poles around the wraps. Then create a clove hitch knot around the other pole.
Use a sheer lashing when two spars are to be opened out like scissors to make a pair of sheerlegs. The sheer lashing is used for lashing together two parallel spars which will be opened out of the parallel to form sheer legs.
-
Floor lashing
Here is a video from the Boy Scouts on how to tie this knot correctly:
https://troopresources.scouting.org/floor-lashing/ This lashing is useful when building any kind of raised surface for a: platform, deck, raft, table, bench, chair, or Chippewa kitchen.
-
Lash Sticks together
Here is a video to help you see how to lash sticks together:
https://troopresources.scouting.org/floor-lashing/ A lashing knot holds two poles together; think of the log wall forts of the American frontier. A diagonal lashing begins with a timber hitch and ends with a clove hitch. This lashing binds poles that cross each other at a 45° to 90° angle. Cross bracing at 90° is only used if a gap exists between poles.
-
Revisit any lashing that the Scouts need help with
-
Lash individual trestles
CLICK HERE FOR SINGLE TRESTLE BRIDGE PROCEDURE, MATERIALS, AND INFORMATION.
Single Trestle Bridge – SCOUT PIONEERING
-
Lash simple patrol gadget
Here is a video to help you build a cool camp gadget:
https://scoutpioneering.com/2012/12/27/chippewa-kitchen/ The Chippewa Kitchen can be seen as the indisputable KING of all “camp gadgets.” It’s the ultimate camp kitchen pioneering project, providing a huge element of convenience to a wide range of camp cooking operations. The Chippewa Kitchen can provide a raised surface for food preparation, a nifty place to hang tools and utensils, a framework from which a pot can be safely suspended over a cooking fire, and primarily, a convenient, raised cooking surface for cooking over hot coals.
-
Proper anchoring
Here is a video to help you properly anchor:
https://scoutpioneering.com/tag/3-2-1-anchor/ Building pioneering projects often requires some type of strong point for attaching a guyline for a tower or derrick. An anchor point might also be needed to anchor one or both ends of a monkey bridge. Sometimes nature will provide a tree or rock in just the right location or you might be able to shift the location of the project to take advantage of a natural anchor.
STAKES

Pioneering Stakes When nature does not provide a solution, anchors can be constructed using stout pioneering stakes.
-
Rope Tackle
Here is a video to explain rope tackle:
https://scoutpioneering.com/videos/pioneering-knots/rope-tackle/ We apply a rope tackle, (also known as the Trucker’s Hitch, Lineman’s Hitch, Load Binder, and Harvester Hitch) where the guylines meet the anchors for pretty much all our pioneering projects. For safety reasons, Taut-Line Hitches should never be used in any pioneering work, because if the tension is eased the knot can slip.
-
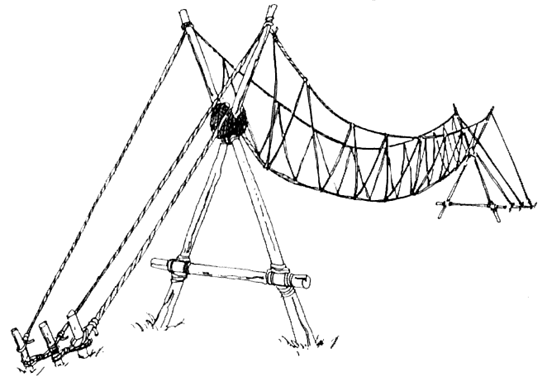
Make a monkey bridge demonstrating everything you have learned
Here is a video to help explain how to build a monkey bridge:
https://scoutingmagazine.org/2019/08/teach-your-scouts-how-to-build-a-monkey-bridge/ Before building any pioneering structure, it’s necessary to first acquire the wherewithal to experience success. The skills, along with the lashing ropes and poles required to build a monkey bridge using double A-frames for better stability, can be used time and again, for a variety of pioneering projects and troop meeting activities. Here’s how to build a monkey bridge. Click on the link above for more information.
-
Intro to splicing & homework
Here is a video on making a splice: https://scoutpioneering.com/eye-splice-video/
https://scoutpioneering.com/2013/03/15/splicing-rope-3/ There are three basic types of splices that are typically made on a three-strand twisted pe: an eye splice, a back splice, and a short splice. The basic process in all three splices is to unlay the strands at the end of the rope, then weave them over and under back into the rope to form the splice.
-
Back, eye, and short splices
Here are three videos to help you learn how to make splices in ropes:
https://scoutpioneering.com/back-splice-video/
https://scoutpioneering.com/eye-splice-video/
https://scoutpioneering.com/short-splice-video/
https://scoutpioneering.com/2013/03/15/splicing-rope-3/ Making the proper splices in the proper places on your ropes is the benchmark of a skilled craftsman. Very often, the ability to do a neat job of splicing is placed on the top of the skills list of ropework. Making splices is not really all that hard to do. There are three basic types of splices that are typically made on a three-strand twisted rope: an eye splice, a back splice, and a short splice. The basic process in all three splices is to unlay the strands at the end of the rope, then weave them over and under back into the rope to form the splice.
-
Turn in splicing
Here is a video to help you perform an eye splice:
Here is a video to help you perform a back splice:
Here is a video to help you perform a short splice:
https://scoutwiki.scouts.org.za/wiki/Pioneering Pioneering skills include knot tying (tying ropes together), lashing (tying spars together with rope), whipping (binding the end of a rope with thin twine), splicing (joining or binding the end of a rope using its own fibers), and skills related to the use, care and storage of ropes, spars and related pioneering equipment.
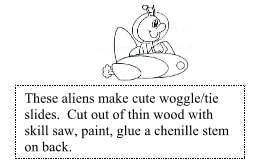
“OTHER PLANETâ€
FLAG CEREMONY
Cubmaster is in astronaut gear, den
chiefs/den leaders dressed as aliens. The
Cubmaster is trying to put the flag on this
new planet. The aliens are curious about
what he is doing and ask him lots of
questions. What is that? What is he
doing with it? Where he is from? All
questions lead to the fact that he is
putting the flag on this planet to claim it
for the USA and Cub Scout Pack ____.
The last remark would be, “I hereby
claim this planet for the USA and Packnotes
____. Please join me in the pledge.
 Â Â Â Â Â Â Â Â Â Â Â Â Â Â Â Â Â Â Â Â Â Â Â Â Â
   “WHAT WILL WE HAVE
IN THE FUTURE?â€
Could be Gathering or opening.
Ask everyone to think of something that will
change in the future and tell about it
(something that will be different in the next
40 years). For instance, will we all have a
cellular phone number assigned to us at birth
that we will keep our whole lives? What
about worldwide money? Will we eliminate
the electric cord so all appliances will be
cordless? Will your property be enclosed in
a clear bubble so it will be like summer all
year? What do you think the future will be
like?
 CUBMASTER MINUTE--“TIDBITSâ€
• Living on Earth is expensive, but it does include a free
trip around the sun every year
• How long a minute is depends on what side of the
bathroom door you're on.
• Birthdays are good for you; the more you have-- the
longer you live.
• Happiness comes through doors you didn't even know
you left open.
Ever notice that the people who are late are often much
jollier than the people who have to wait for them?
• Some mistakes are too much fun to only make once.
• A truly happy person is one who can enjoy the scenery on a detour.
• We could learn a lot from crayons: some are sharp, some are pretty, some are dull, some
have weird names, and all are different colors, but they all exist very nicely in the same
box.
Â
Pioneering - Utensils
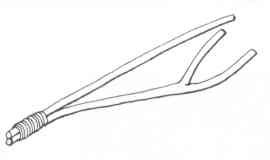 | TongsA pair of tongs can be easily made from two branches (each should have a natural curve to them so that they can 'pinch' easily) lashed together at one end. |
Bamboo CupA bamboo cane will provide a natural cup if you cut the bamboo just below a natural joint (and the same for the next joint up, or the second joint up if you want to have a long tall 'jug'). | 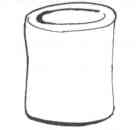 |
|
| SpoonTo make a wooden spoon you will need to whittle a piece of wood down to size. Start with a fairly flat piece and mark the shape of the spoon upon it. Carefully and slowly whittle down to the required shape. Remember to always cut away from you and your hand. |
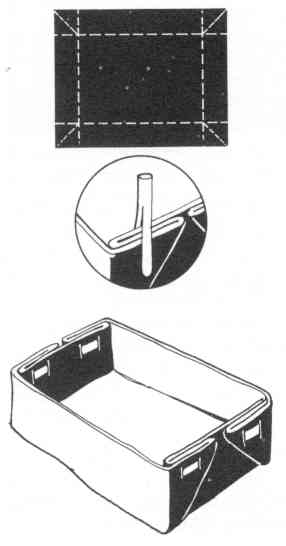
Birch Bark ContainersYou will need strips of birch bark. Do not just pull them off a tree at your local campsite, I don't think the warden will be pleased. To make a square box type container, fold as shown in the diagram and either sew or tie in place once you have the shaper. A temporary fastening can be made using a split peg although this means the container will not hold a great deal of weight before it 'spills open' again.
|  |