Kitchen Gadgets - Bowl Stand 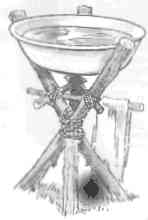 | A bowl stand is perhap the most 'common' gadget made at camp. Simple to construct and useful it is a good item for those learning about pioneering and gadgets. All you need to do is select three suitable lengths of wood (good strong stout branches, not thin weak ones as they will not take the weight of the bowl of water).Simply lash the three branches together about one half to a third of the way down the length. Then open out the tripod so that the three legs are interlocking and 'resting' upon one another. Place a bowl firmly into the top and ensure the stand is sturdy. You may want to secure the feet by driving them into the ground a little. | Note that several different lashing types could be used, although I recommend a simple shear lashing with frapping turns. The trick is to make the lashing and frapping turns slightly loose so that the tripod can open out.
To finish off you can attach a cross frame around the top or bottom of the tripod and add optional extras like towel holders. | |
Kitchen Gadgets - 'Clothes Line' 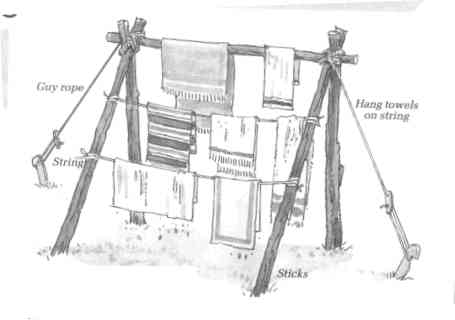
A line for drying those tea towels and sundry clothing items will be essential for any camp kitchen. This is very simple to construct, as you can see from the picture. Simply drive two uprights into the ground and lash a cross piece to join them across the top. To ensure the structure is sturdy you could add two further poles lashed at an angle to form a simple 'A' frame at either end. Attach guy ropes to the two ends and peg out to keep the clothes rack on the ground in those high winds. You can add several lines by lashing ropes across the uprights (or even saplings), on which you can hang your towels to dry. |
Kitchen Gadgets - 'Filter Bins' 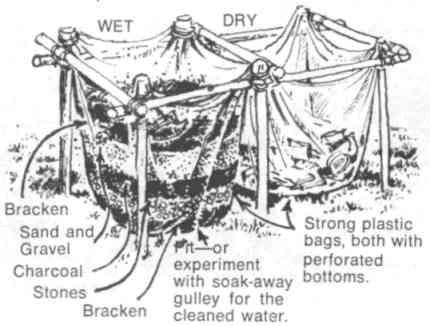 | | A filter bin is another gadget that I would consider essential for the camp kitchen. Waste disposal is very important to handle correctly at camp, hygiene in camp is very important to control for everyone's good health. You will need to build at least two types of bins, one for dry refuse (e.g. empty packets, tins, sweet wrappers) and one for those with a 'wet' content (food slops, dirty washing up water etc.). | Simply construct two 'box' frames formed from uprights driven into the ground lashed together. It would be good idea to site the bins in the same place, within the same frame. Attach a strong plastic bag within each box securing it firmly at the corners at least. Both of the bags should have perforated bottoms (use a fork to make plenty of small holes). The dry bin can be now left as is. The wet bin will now require lining with some material to absorb the waste. A sensible technique would be bracken on the bottom weighed down with small stones. A layer of charcoal and then sand/gravel should go on top of this, finished off with a layer of bracken. This will have all the properties to absorb all types of waste, water/grease etc. If you want to finish this off you could construct a lid to cover the bins (if you think the local wildlife will be inspecting the left-overs when you turn in for the night) although I would leave the lid off during the day for ease of use and to remind everyone exactly where they should be putting their rubbish! |