Pioneering - Nets
A net type construction can be very useful in many different situations. Perhaps the most obvious use is as a 'fishing net' but it can also be used for hammocks, simple 'carry-all' and for storage space (Suspend your food above the ground within the net at camp).
There are two main ways of making a net. One is to tie the knots by hand and the other is to 'knit' it. The latter needs practice whilst the former can be very time-consuming. The best type of 'rope' to use for nets is a type of thick twine or parcel string. Parachute cord is ideal but not exactly available in the shops. Experiment to see which lines work and which dont.
'Knot your net'
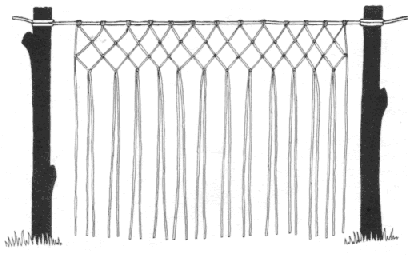
It is much easier to use this technique if you have two 'uprights' to suspend a rope between. Decide how wide you want your net to be and set the two uprights that distance apart. Tie a length of twine between the two (this should be thicker than the twine you will use for the strands). You will now need to cut many lengths of rope. The length will determine the depth of the net (as a guide this will be around 3/8 of the total length of your twine). It may also be an idea to have something to use as a 'ruler' to keep the net spacings equal. Depending upon the intended use of the net, the spacing will be somewhere between 2-5 cm.
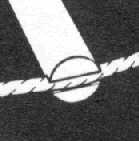
Take the lengths of twine you have cut and 'double' them (fold them in half). Now take the bight (loop) and make a prusik knot over the length of twine you strung between the uprights. Do this all the way along the length of the twine making sure to space them evenly with your ruler.
You will now have many lengths of twine hanging down. Starting at the left hand side we will ignore the very first strand (of the pair as each set hanging down has two strands), this will form the end of the net. Take the second of the pair and hold it together with the first strand of the next pair (it all becomes obvious if you look at the diagram!). Tie these together with an overhand knot. Repeat this process with the next two strands along until you reach the end of the net. Remember to space them evenly with your ruler
.
Now move down a 'row' and repeat. The only difference here is that you will use the very end strands (to form a diamond like pattern). For the next row down you ignore the first and last strand. The next you include them and so on.
When you reach the bottom of the net, you will need to put another length of twine across between the uprights (like the one the strands are hanging from). It would be sensible if this was a thicker strand as it has to bear most of the strain. Now tie the strands hanging down, in pairs, to the bottom line of the net so that they are secure.
You now have a net ready for use. It may help to secure the four corners of the net (where the strands tie to the two lengths) to make sure the net will not slip up and down the lengths. I also find it useful if the lengths have a fair amount 'left over' so that you can tie the net to other things (e.g. use as a hammock).
'Knit your net'
Hammocks
To make a hammock simply construct a net (using your preferred method) which is at least 75 cm across and most certainly wider than your height! As it will have to take your weight make sure you use strong twine or even rope for the top and bottom lengths (ones between uprights). If you cannot do this use a doubled length of your twine instead. You need to leave a long end so that you can secure the hammock between two suitable points.

To prevent the hammock 'twisting over' you will find it useful to use a spacer bar at each end. Simple put a notch in the end of a suitable 'bar' and slip the twine ends into the notches.
You may want to tie the two ends lengths together to form a closed loop (e.g. a bowline) to make it easy to slip the hammock over a protusion.

Note that it takes practice to slip in a hammock, it is not as easy as it looks!