How to use a compass
Finding the directions without a compass
You are lost. I mean really lost. Standing in the middle of nowhere, and you have no idea where to go. If you are really in trouble, remember two things first of all: stay calm, think rationally, and you can survive a long time without food. What you need is to drink.
Further thoughts about extreme survival skills is beyond the scope of this page, seek advice elsewhere beyond this introduction. This page deals with the situation of finding your way, without the aid of a compass. What you have, is the sun, the stars, and the nature around you.
This page is mainly about the northern hemisphere of the earth, actually north of 23.5 °, because I have never been to the southern hemisphere myself (would like to go there of course!). The methods described do of course apply to the southern hemisphere as well, but in some places there may be a need to swap north and south to get it right. I hope you are able to figure it out.
For a start, it may be a good idea to climb a hill, and get a good look around. Try to see traces of human activity. If you see nothing, you should try to figure out in what direction would be the best to travel. If you haven't got a map, try to draw one if you can of the terrain in front of you, and try to mark off where north is, using the methods below. If you have got a map, try to determine where you are. Remember, you don't want to climb more hills than you have to. Also you should carefully consider not to climb if you are very tired. In that case you should consider staying where you are. Consult other sources for information on how to make it easy for rescuers.
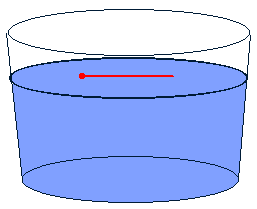
Let us start with the most accurate method. This method requires that you have a pretty clear sky, though, and takes a lot of time. One of the advantages is that you don't need any equipment. You would need a straight pole about 1 meter (or a yard) long, two small sticks or rocks, another stick (or rock) that needs to be a little sharp, and something that can act as a string.
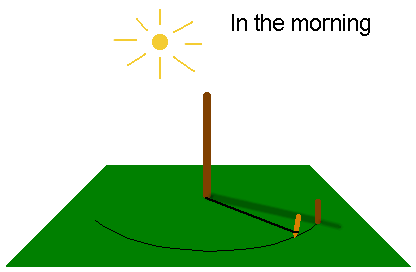 In the morning, at least before noon, the trick starts. Stick the long pole in the ground, upright. The ground around the pole needs to be horizontal. Now, you can place one of the little sticks in the ground exactly where the shadow of the pole ends, like on the figure. Then tie the string to the base of the pole, and tie the little, sharp stick, to the other end, so that when the string is stretched it reaches exactly the little stick standing there in the soil. Then, scratch half a circle in the soil with your sharp little stick, and wait... Wait. Wait until the evening. During the day, the shadow will get shorter and shorter, until noon, when it gets longer again. At noon, when the shadow is at its shortest, you may want to mark the point. The shadow is now pointing north (if you are north of 23.5 ° north). It is however not very easy to see exactly when this is, but it is useful anyway. Finally, the shadow reaches your circle again, and when it does, place your other little stick at the spot where the shadow ends. If you haven't got a string, you could use a pole that has the right length, or try to come up with some other improvised solution. Just make sure what you draw is a circle.
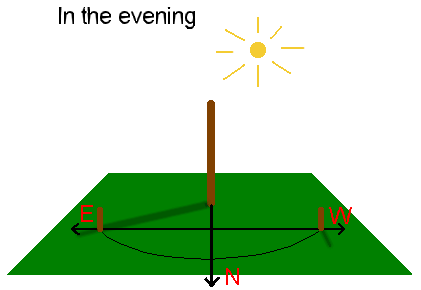 Now, the line from the first stick to the second is west-east, like on the figure. Actually, you may want to mark points regurlarly, because any two points that have exactly the same distance from the base of the pole will give the West-East line. If it is partly cloudy, this may be a good idea.
There is a short, fast version of this one as well. This is only approximate, though, and the further away from the equator you get, the more inaccurate is it. You don't need the sharp stick and the string. Just wait 20 minutes between placing each of the sticks, and the line between the two sticks will be approximately west-east, like on the figure. Often, you wouldn't need anything more accurate.
At night, you can navigate after the stars. You should, however, be careful with walking, it is easy to stumble and fall and get injured, and also easy to lose sight of the stars as you go, and you might start going around in circles. Often it will also be more physically and mentally demanding. 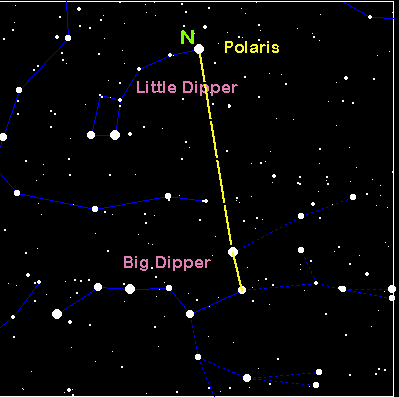 In the northern hemisphere, there is a star that is almost exactly in the north at all times, the Polaris. It is pretty easy to find, if you know the "Big Dipper". (Everybody knows the Big Dipper (or the Plough)?) Take the two stars at the end of the "Big Dipper", and make an imaginary line "upwards", and extend it five times the distance between the two stars. There you have it - Polaris. That way is always north. The figure is courtesy of Kathy Miles. Used with permission.
In the southern hemisphere, you would have to find the Southern Cross. Because I haven't been south of the equator, I can't help you find it, make someone tell you where it is right now, if you don't know it already. That way is south.
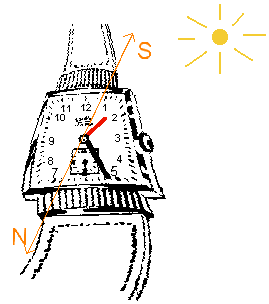 If you have an analog wrist watch, you can use the time to find north. Hold your watch up in front of you, and let the short hand, red on the figure, that indicates hours point at the sun. While holding it like this, cut the angle between the red arrow and 12 o'clock in two, (noonwards if the time is before 6am or after 6pm), that way is south. (The reason you need to cut it in two, is because the clock takes two rotations while the sun takes one around the earth, it is of course the other way around, but never mind.)
Many people wear digital watches these days (I do myself, if I wear one at all). If you do, draw an analog watch face on a piece of paper, and then mark the hour hand on using the digital watch. The rest of the method is identical.
This method can be used even when it is pretty foggy. Although you may not be able to see the sun, it may still cast a shadow. If you take up a straw or a tiny stick, and you may see a shadow. You just have to remember that the shadow points the opposite way from the sun, but the rest of it is quite similar as above.
 Want to make your own compass? Sure. You need a needle and a glass of water. A needle can in fact float on the water, or that is, on the surface tension forces if put carefully on the surface. Just put it carefully down on the surface of the water. This demands a lot of patience though. There are three tricks that makes it go easier. One: Put the needle on a piece of paper. If the paper floats too, there is no problem, and if the paper sinks, it'll probably leave the needle. If you put some grease on the needle that isn't water-based, it'll go easier, or if you put it carefully down with a fork or something. Once it has got there, it stays there pretty good.
If the needle is magnetic, it will act as a normal compass and be very accurate. A problem is though, that you don't know north from south. All you know is that it lays north-south. You would have to use one of the other techniques to find out, or make a good guess.
The greatest problem with this is: Not many needles are made of magnetic materials these days.... You can't just use any needle. You may just have to look around to see what you can find, if you want to make a yourself a compass.
What if there is no shadow? Then, there are a few methods based on natural signs. I will deal with the ones I have checked myself.
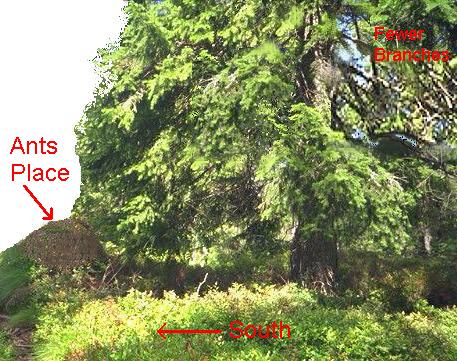
It is very much about trees. First of all, there will be fewer branches to the north. This is usually easiest to see if you look up along the trunk of the tree. The north face of the tree would be more humid than the south face, which is something most species of lichen (or moss) likes, and consequently, there will be more of it on the north face. On the image above, you can also see that ants likes to build their nests on the south side of the tree.
It is also worthwhile to look at how snow melts. In the spring in the mountains, snow will melt faster on the south face of rocks, or in south faced slopes. Also, vegetation and undergrowth will typically be thicker on the South facing slopes, and also fruits ripen earlier on the South facing slopes.
These methods are not very reliable, I am afraid. Winds may alter the average conditions significantly, and cause deviations. If you use natural signs, you should use as many signs as you can before you draw a conclusion.